Building from Source-Code
Introduction
This tutorial will walk you through cloning, deploying, and building the NEPI Engine File System from source code.
What you will need:
1) 1x NEPI-enabled device with internet access. This tutorial uses an edge-compute processor box that includes an NVIDIA Jetson Xavier NX embedded GPU with NEPI Engine software installed.
NOTE: See available off-the-shelf NEPI enabled edge-compute options at: /hardware/
2) 1x PC with internet access and configured to access the NEPI device's File System.
NOTE: This tutorial assumes you have already setup connections between your PC and nepi device as explained in the following tutorials:
https://nepi.com/nepi-tutorials/nepi-engine-connecting-and-setup/
https://nepi.com/nepi-tutorials/nepi-engine-user-storage-drive/
https://nepi.com/nepi-tutorials/nepi-engine-accessing-the-nepi-file-system/
Cloning and Deploying the NEPI File System
Cloning the NEPI Source-Code
!!! This step should be done on your LINUX PC
a) Install Git on your Linux PC if not installed by opening a terminal and typing:
sudo apt-get install git
b) Create a user account on github and configure your ssh credentials if not already done following these instructions:
Connecting to GitHub with SSH - GitHub Docs
c) On your Linux PC with Git installed and ssh credentials configured and tested, open a terminal window and enter the following commands to clone the latest nepi_engine_ws and submodule source-code from the development branch:
git clone git@github.com:nepi-engine/nepi_engine_ws.gitcd nepi_engine_wsgit checkout maingit submodule update --init --recursive
NOTE: If you need the NEPI development branch, type:
git checkout ros1_developgit submodule update --init --recursive
NOTE: If you need to edit any of the NEPI repo's submodules, follow the instructions below. Otherwise, jump to the "Deploying NEPI Source-Code to the Device" section below.
a) All of the NEPI source-code is organized into different submodule repos located in the nepi_engine_ws's "src" folder. From the top level "nepi_engine_ws" folder type :
cd src
ls
b) Make any changes to the source-code you want to make and save the changed files.
Updating NEPI Source-Code
!!! This step should be done on your LINUX PC
If you have already cloned the source-code and just want to update to the latest, follow these instructions
a) Open a terminal on your PC in the nepi_engine_ws top level project folder
b) Type the following:
git pullgit submodule update --init --recursive
Deploying NEPI Source-Code to the Device
!!! This step should be done on your LINUX PC
a) Deploy the source code to the NEPI device using the one of the deploy_nepi sh script located in the top level nepi_engine_ws cloned repo.
The _repos script will only deploy repos listed in the first line of the script. Change as needed based on the repos you have modified
./deploy_nepi_repos.sh
NOTE: The deploy_nepi_complete is only needed in the current system does not have NEPI already installed, or you want to rebuild the entire code-base for some reason.
b) If you have not done so yet, setup an NTP time server on your PC to automatically sync the clock on your NEPI device following the instructions at:
https://nepi.com/nepi-tutorials/nepi-engine-configuring-ntp-time-syncing/
Building the NEPI Source Code on the Device
!!! This step should be done on your NEPI DEVICE in an ssh connected terminal
NOTE: If you run into issues building, you may need to delete any old deployed NEPI deployments by typing the following and redeploying in the previous section:
sudo rm -r /mnt/nepi_storage/nepi_src/nepi_engine_ws
a) SSH into your NEPI device and stop all NEPI processes, build the file system, and restart NEPI processes by typing:
nepistop
nepibld
nepistart
NOTE: The NEPI default sudo password is "nepi"
NOTE: you can use the bash aliases "nepistop" and "nepistart" listed above at any time during testing to not only stop and restart your NEPI environment to apply any changes, but also see the NEPI messages in real-time to identify any issues with the changes you made.
NEPI Customization
To learn more about NEPI File System and RUI development, see the following tutorials:
NEPI File System Customization Tutorial
https://nepi.com/nepi-tutorials/nepi-engine-customizing-the-nepi-file-system/
NEPI Resident User Interface (RUI) Customization Tutorial
https://nepi.com/nepi-tutorials/nepi-engine-customizing-the-nepi-rui-system/
Customizing the NEPI File System
Introduction
This tutorial will walk you through customization of the NEPI Engine File System that would be useful for NEPI developers.
What you will need:
1) 1x NEPI-enabled device with internet access. This tutorial uses an edge-compute processor box that includes an NVIDIA Jetson Xavier NX embedded GPU with NEPI Engine software installed.
NOTE: See available off-the-shelf NEPI enabled edge-compute options at: /hardware/
2) 1x PC with internet access and configured to access the NEPI device's File System.
NOTE: This tutorial assumes you have already cloned and built the NEPI File System repo as explained in the following tutorial:
https://nepi.com/nepi-tutorials/nepi-engine-building-from-source-code/
Testing and Fixing File System Errors
!!! This step should be done on your LINUX PC
Open and refresh the NEPI RUI and test that the system and any expected updates are working
Updating Python Files with SFTP
While any cpp based file changes will require a full deploy/build to apply, since python files are not compiled, it is sometimes helpful to just replace them on the NEPI file system while debugging an python script.
From a terminal window on your Linux PC opened in the source folder you want to update from, type:
sftpn
then navigate to the appropriate location on your NEPI device's file system.
NOTE: While the 'sftpn' function will log in at the nepi home folder, their are a number of specific sftp shortcuts that will log in to a specific folder on the device, making it easier to 'get' 'put' files located in common NEPI folders. A few of these are listed below:
- Common NEPI User Driver Folders
cfg = /mnt/nepi_storage/user_cfgai = /mnt/nepi_storage/ai_modelsauto = /mnt/nepi_storage/automation_scriptsdata = /mnt/nepi_storage/datainstalls = /mnt/nepi_storage/installssrc = /mnt/nepi_storage/nepi_srctmp = /mnt/nepi_storage/tmpuser = /mnt/nepi_storage/user_cfg
- Common Nepi File System Folders
aifs = /opt/nepi/ros/share/nepi_aifsapi = /opt/nepi/ros/lib/python3/dist-packages/nepi_apiapps = /opt/nepi/ros/share/nepi_appsdrivers = /opt/nepi/ros/lib/nepi_driversetc = /opt/nepi/ros/etclib = /opt/nepi/ros/libmanagers = /opt/nepi/ros/lib/nepi_managersros = /opt/nepi/rosnfi = /mnt/nepi_storage/nepi_full_imgnfia = /mnt/nepi_storage/nepi_full_img_archivepython = /opt/nepi/ros/lib/python3/dist-packages/rui = /opt/nepi/nepi_rui/src/rui_webserver/rui-app/srcsdk = /opt/nepi/ros/lib/python3/dist-packages/nepi_sdk
Once you are in the folder with the file(s) you want to update, just type:
put YOUR_FILENAME
or to upload all files from your current folder
put *
Then just call 'nepistop' and 'nepistart' from an ssh session to see your changes run.
Customizing NEPI System Configuration
While most NEPI Engine settings are configurable through the RUI, API calls, and user config files, there are some low-level configuration items like serial number, logos, and SSH keys that require changes at the file system level using SSH access. The following sections assume you have set up and tested your SSH access as described in the "Accessing the NEPI File System" tutorial.
Assuming you have set up an SSH alias as described during the SSH setup process, just open a terminal on your Linux connected PC and type:
sshn
NOTE: Both Linux vi and nano editors are installed in the NEPI file system. While this document uses the vi editor in examples, some might find the nano editor easier to use.
Change Serial Number
If you would like to give your NEPI device a unique serial number and device name, do the following from an SSH connected terminal window:
vi /opt/nepi/sys_env.bash
Then edit the value next to the "DEVICE_SN=" entry.
Change System Base IP Address
While NEPI Engine allows adding additional IP address aliases that make it easy to integrate a NEPI-enabled device into an existing local area network (LAN), the system's factory base IP address (192.168.179.103) is only changeable through file system configuration editing. If you plan to connect multiple NEPI-enabled devices to the same LAN, you will need to make sure that they each have a unique Base IP Address. Once changed, you will need to remember this address to access your system, so it is recommended that you:
NOTE: use an IP address close to the original one such as (192.168.179.104) making it easier to remember as well as search for the system in a block of IP addresses if you forget the new value
To change your NEPI system's base IP address, you will need to do the following from a ssh connected terminal window and edit the "address" value in the file:
vi /etc/network/interfaces.d/nepi_static_ip
Change NEPI CONNECT Configuration
If you plan to use your NEPI-enabled device to upload data and download software to a remote server running Numurus' NEPI Connect software you may need to modify some of you NEPI device's NEPI Connect configuration files.
1) Check that your NEPI device has a valid NEPI Connect Unique NEPI ID (NUID) and public SSH key in the "NEPI CONNECT" box on the device's RUI APPLICATIONS/CONNECT tab as shown below.
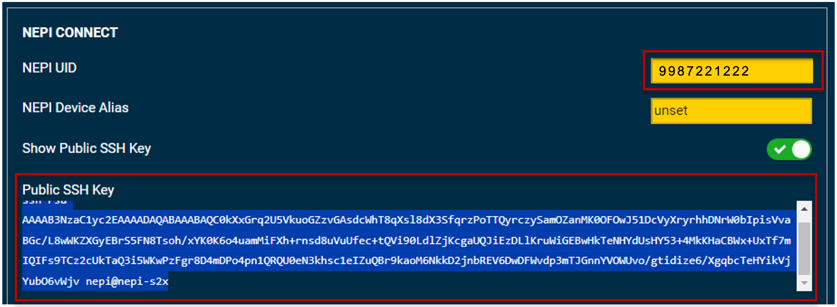
If your 10 digit NUID is set to "9999999999" and/or the Public SSH Key box is empty, your system has not yet been configured for NEPI Connect communications. If this is the case, use the following instructions to set up the NEPI Connect credentials on your device:
If you need to configure a NEPI NUID and NEPI Connect public SSH key, use the instruction below to create or update them:
a) Run the NEPI Connect identity application
cd /opt/nepi/nepi_link/nepi-bot/devinfo
python3 change_identity.py -n <Your 10 digit NUID>
For security reasons, it is recommended that you use some random number generator to generate a random 10 digit NUID value. For example:
python3 change_identity.py -n 3989789099
b) Press enter twice to skip a passphrase and (optional) press p to display the key in the terminal.
c) After rebooting your NEPI device the new NUID and public SSH key you just created should now be visible in the RUI APPLICATIONS/CONNECT tab.
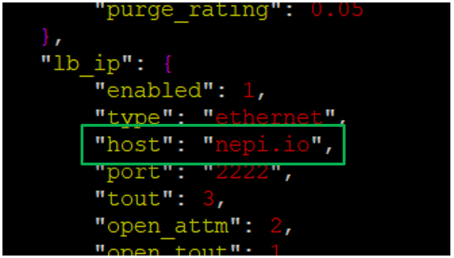
2) The internet address NEPI devices try to connect to during a NEPI Connect connection process is set in a configuration file on the device's NEPI file system. The default NEPI Connect server address set on new installation's is to a Numurus hosted NEPI Connect installation at address nepi.io. If you are connecting to a NEPI Connect installation at another internet location, you will need to use the following instructions to change that location on your device:
a) Open NEPI Engine's "NEPI bot" config file and edit the NEPI Connect installation location using the following commands:
cd /opt/nepi/nepi_link/nepi-bot/cfg/bot
nano config.json
b) Then edit the "host" address value under the NEPI Link communications type(s) you plan to use.
Example: If you are connecting using an IP communications gateway (Ethernet, WiFi, Cellular…) you would edit the "host" ip location under the "lb_ip" address driver configuration. This could be either an intent domain name like "nepi.io" or a numeric IP address like "44.229.9.192".
c) After rebooting your NEPI device will use these new NEPI Connect location values.
Configuring NEPI's ROS Launch File
During the NEPI Engine boot process, all ROS nodes are started from the "nepi_base.launch" file. You can edit this file by typing:
<Your Git Code Folder>/nepi_base_ws/src/nepi_edge_sdk_base/launch
vi nepi_base.launch
Customizing the NEPI RUI System
Introduction
This tutorial will walk you through customization of the NEPI Engine Resident User Interface System that would be useful for NEPI developers.
What you will need:
1) 1x NEPI-enabled device with internet access. This tutorial uses an edge-compute processor box that includes an NVIDIA Jetson Xavier NX embedded GPU with NEPI Engine software installed.
NOTE: See available off-the-shelf NEPI enabled edge-compute options at: /hardware/
2) 1x PC with internet access and configured to access the NEPI device's File System.
NOTE: Instructions for configuration a PC and connecting to a NEPI device's File System are provided in the NEPI Engine - Getting Started - Accessing the NEPI File System tutorial at: https://nepi.com/nepi-tutorials/
Customizing and Compiling NEPI RUI
NEPI's web-browser supported Resident User Interface system is built on JavaScript and React, a JavaScript-based UI development library. The RUI interacts with the NEPI ROS-based application system through a custom ROS-HTML Bridge Node that converts data back and forth between the two environments. All data and controls available on the RUI have a ROS based interface, and vice versa.
Cloning the NEPI Source-Code
a) Install Git on your Linux PC in not installed.
b) Create a user account on github and configure your ssh credentials if not already done following these instructions:
Connecting to GitHub with SSH - GitHub Docs
c) On your Linux PC with Git installed and ssh credentials configured and tested, open a terminal window and enter the following commands to clone the latest nepi_engine_ws and submodule source-code from the development branch:
NOTE: Replace "ros1_main" with "ros1_develop" in the "git checkout" line below if you want to checkout the development branch.
git clone git@github.com:nepi-engine/nepi_engine_ws.gitcd nepi_engine_wsgit checkout ros1_maingit submodule update --init --recursive
NOTE: The NEPI RUI source-code is located in the nepi_rui submodule repo at:
src/nepi_engine_ws/src/
Editing the NEPI RUI Source-Code
If you need to edit any of the NEPI repo's submodules, follow the instructions below. Otherwise, jump to the "Deploying NEPI Source-Code to the Device" section below.
a) Change directories to the RUI repo submodule folder and checkout the "master " branch for that repo by typing the following within the submodule folder:
cd src/nepi_engine_ws/src/
git checkout master
b) Make any changes to the source-code you want to make and save the changed files.
Deploying NEPI RUI Updates
NOTE: The following section assumes your NEPI device's bash env is configured with the shortcut aliases suggested earlier in this tutorial. Alternatively, you can find more detailed instructions for cloning NEPI Engine GitHub source-code repos, see the NEPI Engine - Software File System manual at:
https://nepi.com/documentation/nepi-engine-nepi-file-system/
a) Change back to the nepi_engine_ws base repo folder.
b) Setup your Linux PC environment to access the NEPI device's file system. You can find an example set of environment variables and values in the sample_deploy_env_vars.sh script in the same directory, which you can copy and edit for your custom setup and source, or simply add valid definitions for these environment variables directly to your ~/.bashrc.
sudo vi ~/.bash_aliases
c) Deploy the source code to the NEPI device using the deploy_nepi_engine_source.sh script in nepi_engine_ws.
./deploy_nepi_engine_source.sh
d) Open an SSH terminal to your NEPI device and run the following commands:
ruibld
NOTE: NEPI default sudo password is "nepi"
Testing RUI Changes
If the build was successful with no errors, refresh the NEPI RUI in your browsers
Editing the RUI
Configuring the RUI Menu
You can modify the RUI's top menu by following these instructions:
1) Open the App.js menu file from the cloned nepi_rui repo on you
cd <Your Git Code Folder>/nepi_base_ws/src/nepi_rui/src/rui_webserver/rui-app/src
vi App.js
2) Edit the menu, save, and exit
Changing the RUI Logo Image
You can update the logo shown at the top-left of the RUI screen using the following instructions:

1) Create a logo with the correct aspect ratio
Logo (1004×254): ~4:1
2) Convert your PNG/JPG image to webp format. Many browser-based web tools can do this. E.g., https://cloudconvert.com/webp-converter
3) Change the logo file on the device to your new webp-formatted file(s) in the cloned source-code repo on your PC.
<Your Git Code Folder>/nepi_base_ws/src/nepi_rui/src/rui_webserver/rui-app/src/logos/logo.webp
Editing or Creating RUI Tabs
Each tab in the RUI web application is management by its own ".js" file (i.e. Dashbard.js). Within these js page files, the page is defined by a combination of JavaScript/react layout directives and mappings to NEPI ROS topics and services defined by the NEPI back-end codebase (see next section).
Example:
renderSaveData() {
const { onToggleSaveData, systemStatusDiskRate, deleteAllData } = this.props.ros
return (
<Section title={"Save Data"}>
<Label title={"Save Data"}>
<Toggle id={"toggle_save_data"} onClick={onToggleSaveData} />
Where the RUI DASHBOARD tab's "Save Data" section is defined by the "renderSaveData()" function, which maps the "onClick" js variable to the ROS-bridge mapped "onToggleSaveData" service, which connects to the NEPI ROS "/nepi/s2x/save_data" system control topic.
Editing or Creating RUI-ROS Interfaces
The RUI interfaces with the NEPI Engine ROS processes through a ROS to JSON and ROS to HTML bridge. These bridge data and control mappings are located in the file:
<Your Git Code Folder>/nepi_base_ws/src/nepi_rui/src/rui_webserver/rui-app/src/Store.js
You can edit or add new RUI-ROS bridge interfaces within this file. Some examples are provided in the following sections.
Adding Controls
Toggle Control
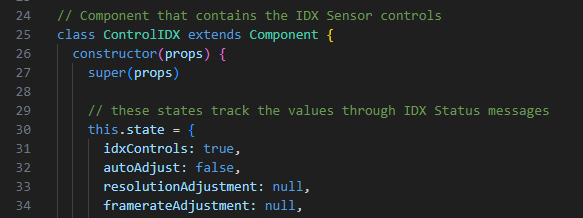
For our Toggle Control tutorial, we will be adding a toggle control to the RUI Sensors/Imaging tab that turns IDX auto adjustment on and off. This process will:
- Hide or unhide the toggle switch control based on the value of the "has_auto_adjustment" value in the sensor's "IDXCapabilitiesQuery" ROS published service call. This capability component is a Boolean data type.
- Updates the toggle's state based on the value returned in the "auto" sensor's "IDXStatus" ROS published topic message. This status component is a Boolean data type.
- Send new value on state change to the sensor's "idx/set_auto_adjust" ROS subscriber topic. This topic accepts a Boolean data type.
Instructions:
1) First, we need to define a function that maps from the RUI js environment back to our NEPI ROS "set_auto_adjust" control ROS topic in the repo's "Store.js" file. We will use the name "setIdxAutoAdjust" as our function name..
a) Open the "Store.js" file located in the NEPI Engine "nepi_ws_base" repo folder at:
"nepi_engine_ws\src\nepi_rui\src\rui_webserver\rui-app"
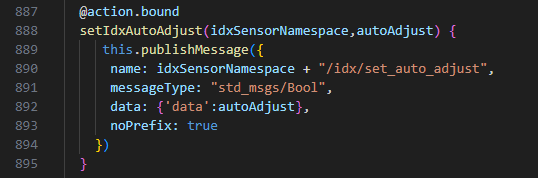
b) Define and bind the "setIdxAutoAdjustment" function to the sensor node's "idx/auto_adjust" subscriber topic. This topic takes a Boolean type.
@action.bound
setIdxAutoAdjust(idxSensorNamespace,auto_adjust) {
this.publishMessage({
name: idxSensorNamespace + "/idx/set_auto_adjust",
messageType: "std_msgs/Bool",
data: {'data':auto_adjust},
noPrefix: true
})
}
2) Next, add the new toggle control to the RUI's existing Sensors/Imaging tab:
a) Open the "NepiSensorsImagingControls.js" file located in the NEPI Engine "nepi_ws_base" repo folder at:
"nepi_engine_ws\src\nepi_rui\src\rui_webserver\rui-app"
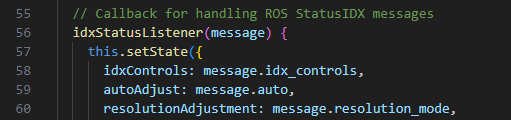
b) Define and initialize a new local state variable to map the IDXStatus "auto" component to in the "this.state = " declaration. (assuming it is not already there). You can also initialize the state value, or assign "null".
c) Map the IDXStatus "auto" status component to our newly created state variable in the component to the state component in the "this.setState" function declaration (assuming it is not already there).
d) Next, we want to add a link to the new "setAutoAdjust" function we created in the Store.js file by adding a the function name using a "const" declaration in the "render" section we want to use the function in. The Store.js file is linked through the class's " this.props.ros" property, so we will add it to that list.

e) ) Add a toggle switch declaration in the page's "render" section that updates the toggle state "checked" state based on the current value of the "autoAdjust" state variable we added to the class's state property, and connect the "onClick" with a lamda function to the "setAutoAdjust" function we defined that passes the oppisite value of the toggle's current "checked" state.
<Label title={"Auto Adjust"}>
<Toggle
checked={this.state.autoAdjust}
onClick={() => setIdxAutoAdjust(this.props.idxSensorNamespace,!this.state.autoAdjust)}
/>
</Label>

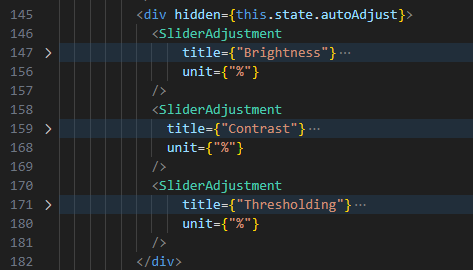
e) Finally, we want to hide the "Brightess, Contrast, and Threshold" controls when the "autoAdjust" state is "True" by adding a "<div>" section around those controls and use the div's "hidden" property.
<div hidden={this.state.autoAdjust }>
…
</div>
3) Save your files, deploy to your system, and rebuild the RUI following the instructions in "Rebuilding Front-End Changes" section of this tutorial.
Button Control
For our Button Control tutorial, we will be adding a button control to the RUI Sensors/Imaging tab that resets the sensor's control's when pressed and released. This process will:
- Send and ROS "Empty" message to the sensor's "idx/reset_controls" ROS subscriber topic.
Instructions:
1) First, we need to define a function that maps from the RUI js environment back to our NEPI ROS "reset_control" ROS topic in the repo's "Store.js" file. We will use the name "IdxSettingsResetTriggered" as our function name..
a) Open the "Store.js" file located in the NEPI Engine "nepi_ws_base" repo folder at:
"nepi_engine_ws\src\nepi_rui\src\rui_webserver\rui-app"
b) Define and bind the "setIdxAutoAdjustment" function to the sensor node's "idx/auto_adjust" subscriber topic. This topic takes a Boolean type.
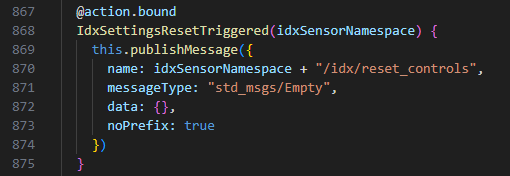
@action.bound
IdxSettingsResetTriggered(idxSensorNamespace) {
this.publishMessage({
name: idxSensorNamespace + "/idx/reset_controls",
messageType: "std_msgs/Empty",
data: {},
noPrefix: true
})
}
2) Next, add the new button control to the RUI's existing Sensors/Imaging tab:
a) Open the "NepiSensorsImaging.js" file located in the NEPI Engine "nepi_ws_base" repo folder at:
"nepi_engine_ws\src\nepi_rui\src\rui_webserver\rui-app"
b) Add a link to the new "IdxSettingsResetTriggered" function we created in the Store.js file by adding a the function name using a "const" declaration in the "render" section we want to use the function in. The Store.js file is linked through the class's " this.props.ros" property, so we will add it to that list.

c) Add a button declaration in the page's "render" section that uses a lamda function call in the "onClick" property to the "IdxSettingsResetTriggered" function we defined, and give the button a label "Reset Sensor".
<ButtonMenu>
<Button onClick={() => IdxSettingsResetTriggered(this.state.currentIDXNamespace)}>{"Reset Settings"}</Button>
</ButtonMenu>

3) Save your files, deploy to your system, and rebuild the RUI following the instructions in "Rebuilding Front-End Changes" section of this tutorial.
Rebuilding Front-End Changes
For detailed instructions on rebuilding and deploying any changes to the NEPI RUI system, see the NEPI Engine - User Interface System manual at:
https://nepi.com/documentation/nepi-engine-user-interface-system/
NEPI Docker Lite Setup
Introduction
The NEPI Docker Lite Setup tutorial walks you through installing, configuring, and running the NEPI software inside a Docker container while making minimal changes to the host operating system. This tutorial focuses on setting up the required NEPI users, configuring the Docker environment, initializing NEPI storage and images, and launching the NEPI container and Resident User Interface for the first time.
The Lite setup is designed for fast evaluation, development, and a demonstration trial on edge devices before running the NEPI Full Container Installation. It allows users to explore NEPI's AI, automation, and hardware integration capabilities without NEPI managing system-level services such as networking, SSH, or storage sharing. This makes it ideal for learning, prototyping, classroom use, and early-stage testing before committing a device to a production configuration.
Prerequisites:
Before you begin, make sure you have the following ready. This Lite setup is designed to be quick and makes minimal changes to the system.
Hardware
NEPI-compatible device (NVIDIA Jetson)
Monitor, keyboard, and mouse connected to the device
Internet connection (Ethernet recommended, WiFi also works)
Operating System
Debian-based Linux
Tested with Ubuntu 20.04
Default Jetson Linux images are supported
User Access & Permissions
Admin (sudo) access on the device
Ability to reboot the device when prompted
Time Required
30-45 minutes
This includes:
User and environment setup
Docker Lite configuration
Image download and first launch
Note: This setup includes a few reboots. Plan to complete it in one session
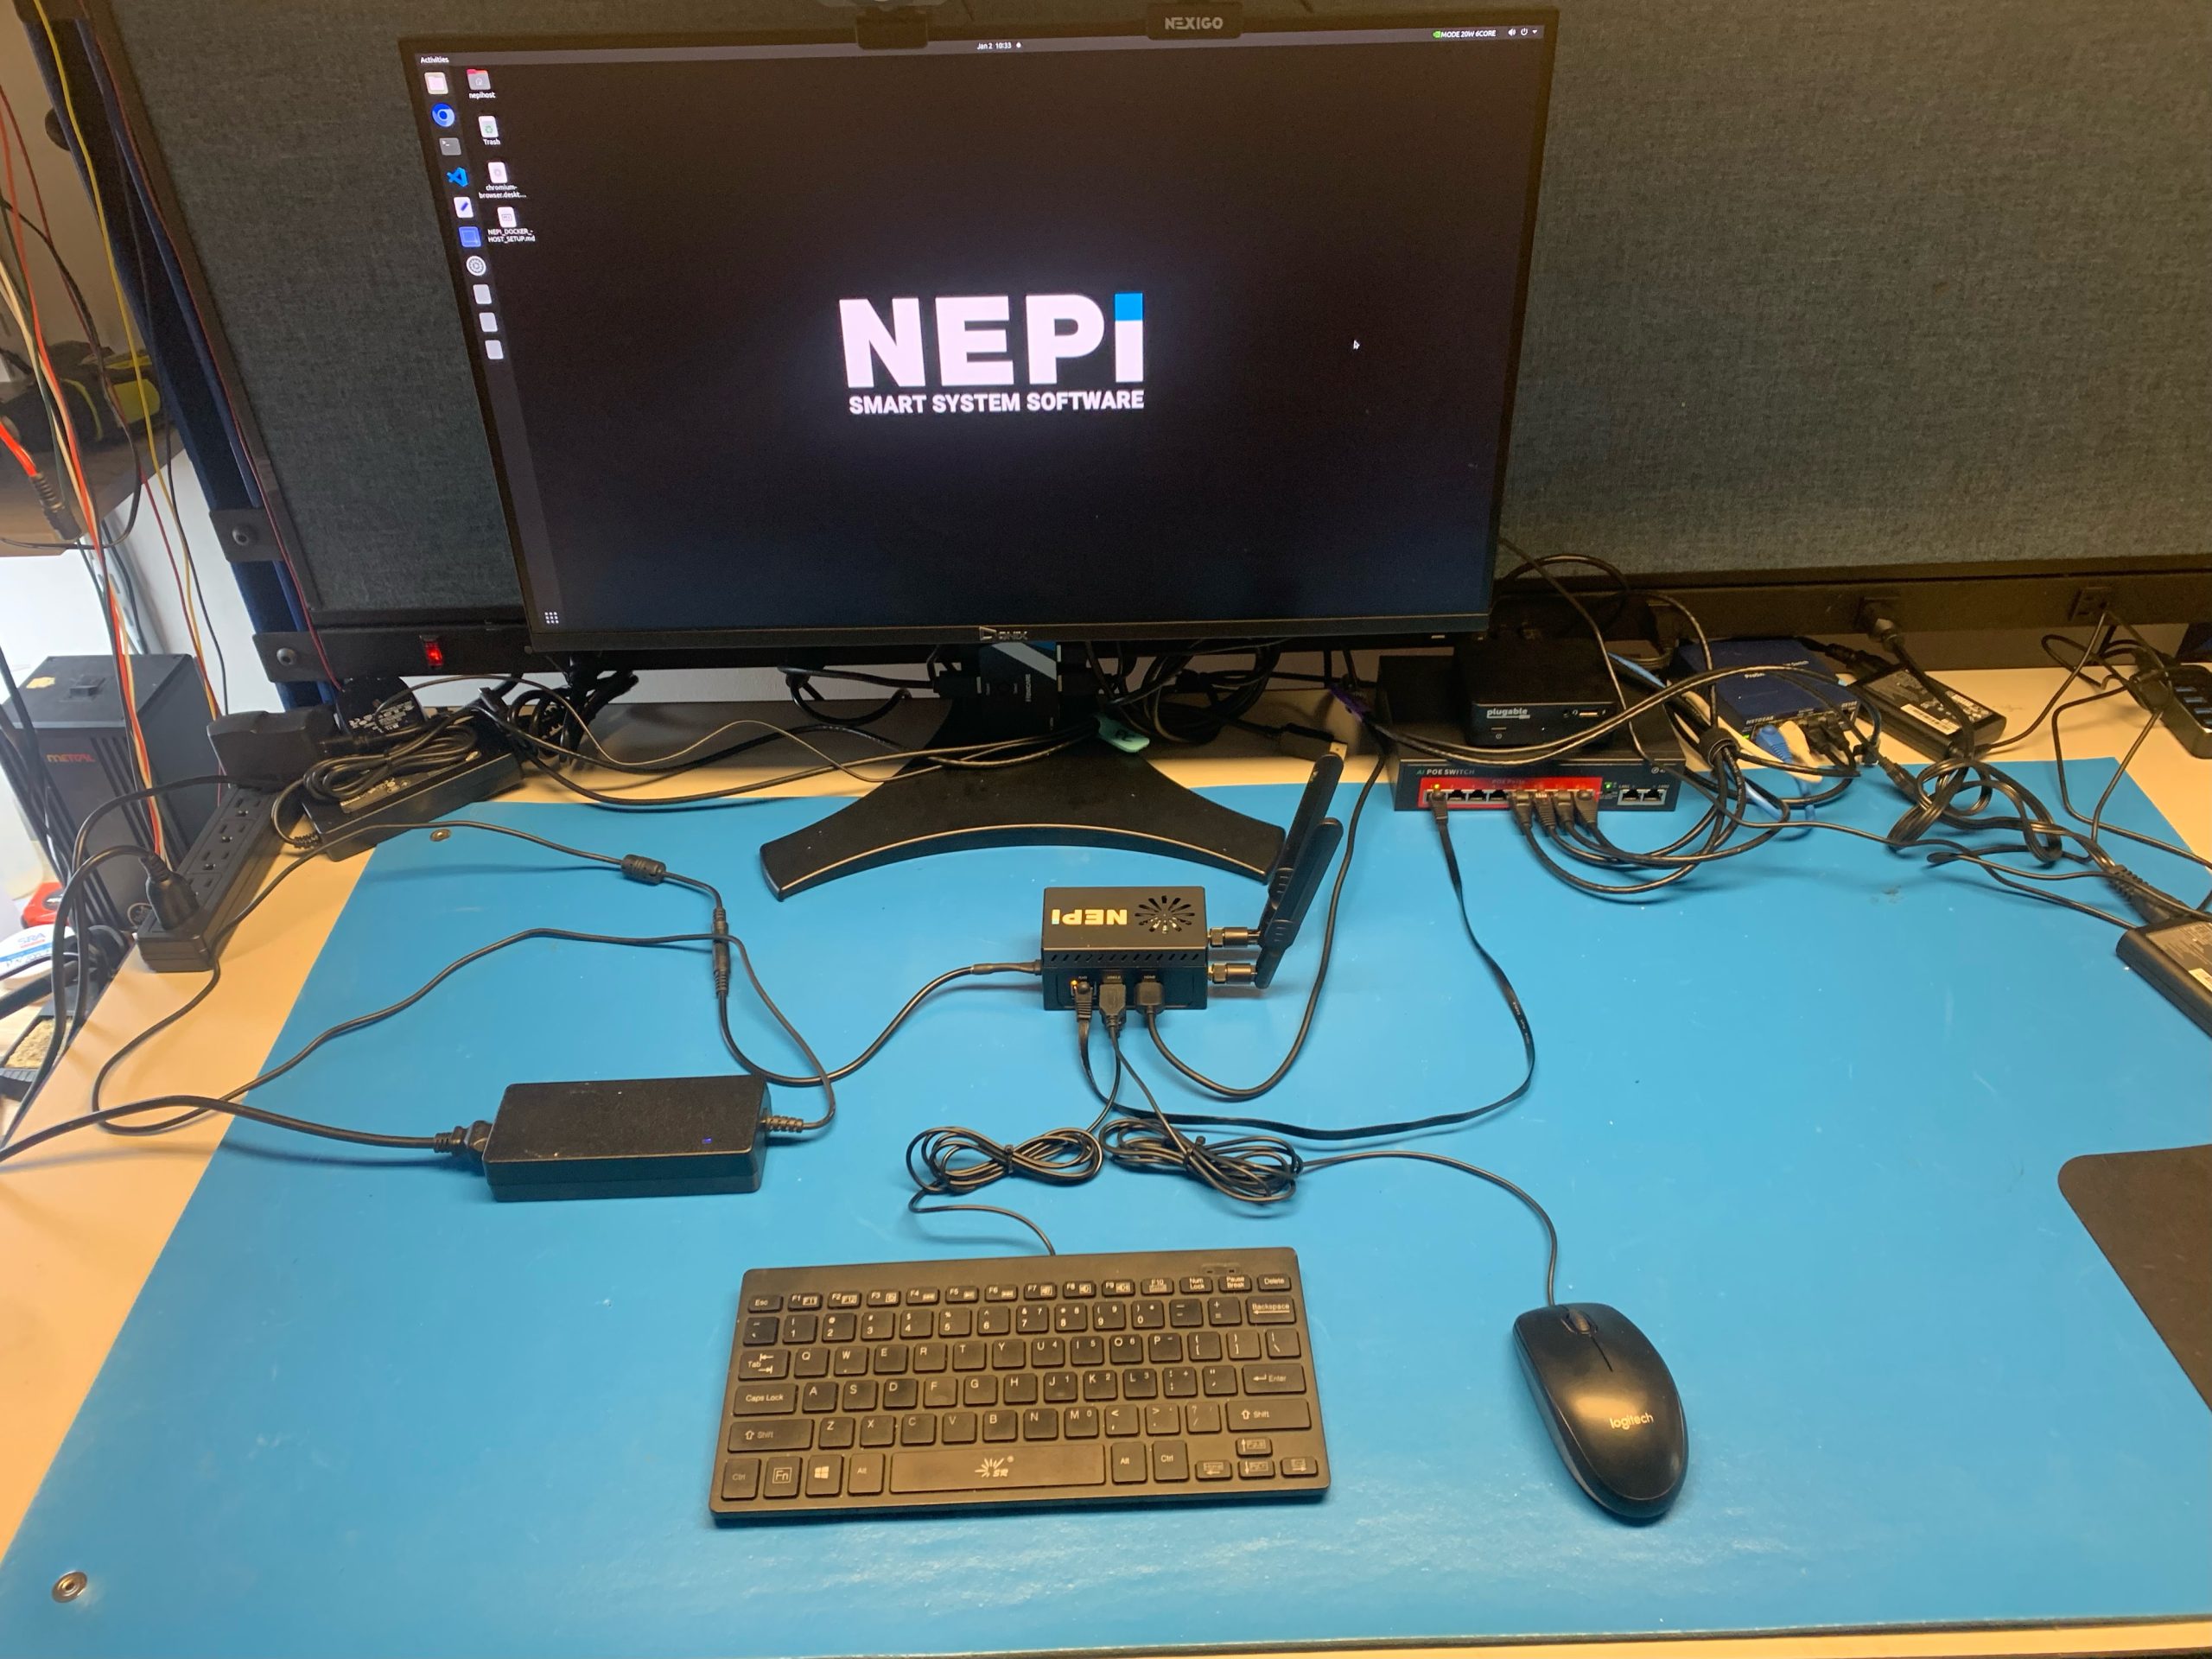
NEPI Docker Lite User Setup
This section creates the nepihost user account and prepares your device to install NEPI Docker by cloning the NEPI setup repository that contains the required installation scripts.
1) Log into a user account with Administrator privileges, or use the existing nepihost account if available.
2) Open a Terminal window: right-click the desktop / Open in Terminal
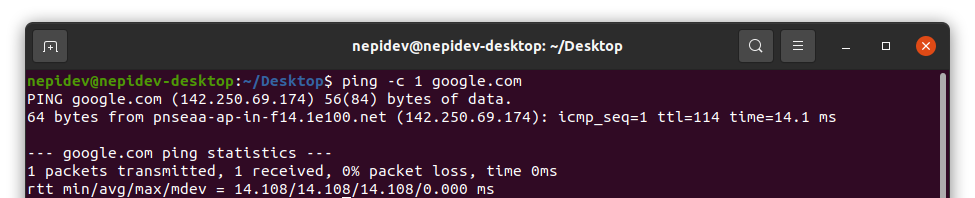
3) Confirm your system has internet access by running the following command:
ping -c 1 google.com
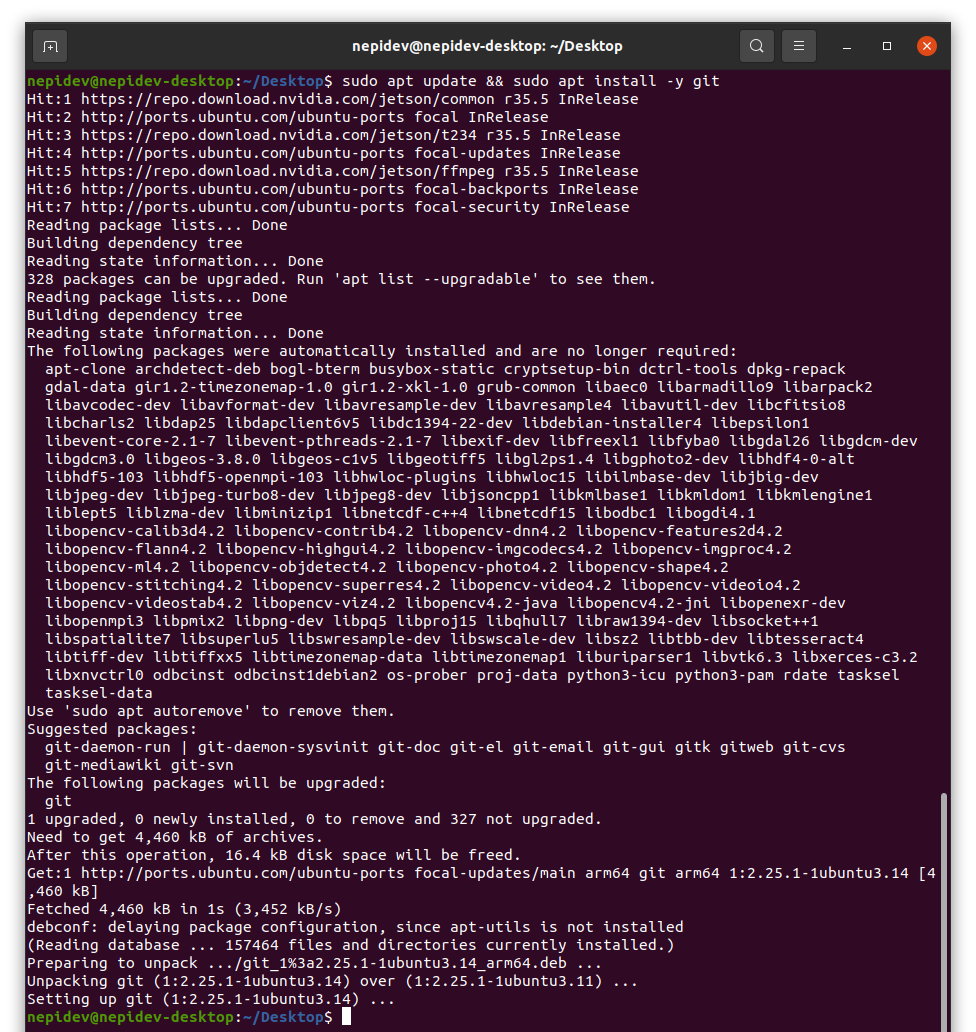
4) Update Git application:
sudo apt update && sudo apt install -y git
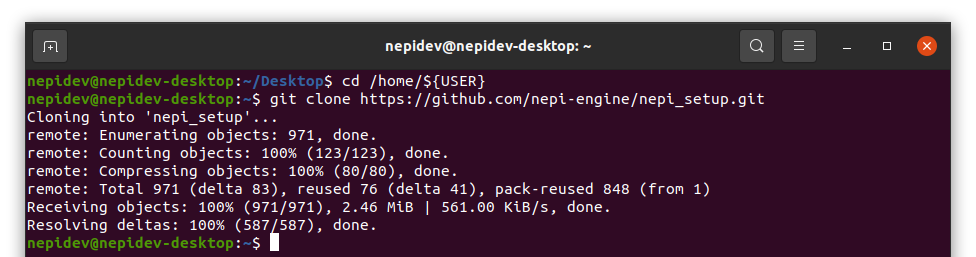
5) Clone the NEPI setup repository:
cd /home/${USER}
git clone https://github.com/nepi-engine/nepi_setup.git
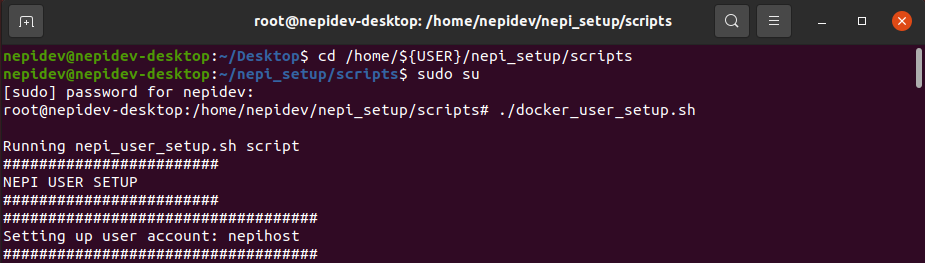
6) Run the NEPI Docker user setup script (sudo password is '#Nsetup4You'):
cd /home/${USER}/nepi_setup/scripts
sudo su
Then:
./docker_user_setup.sh
Start Screen:
End Screen:

7) POWER CYCLE your system when complete to apply the new settings
NOTE: This section creates a new user account nepihost, the next section will have you login to this new user with the sudo password nepi.
NEPI Docker Lite Environment Setup
This section will set up the NEPI Docker required software environment.
1) Log into the nepihost account created in Docker User Setup (sudo password is now 'nepi'). Go through any new user starter popups. Then Open terminal.
2) Make sure your system has internet access by running the following command:
ping -c 1 google.com
3) Clone the NEPI Setup repo:
cd /home/${USER}
git clone https://github.com/nepi-engine/nepi_setup.git
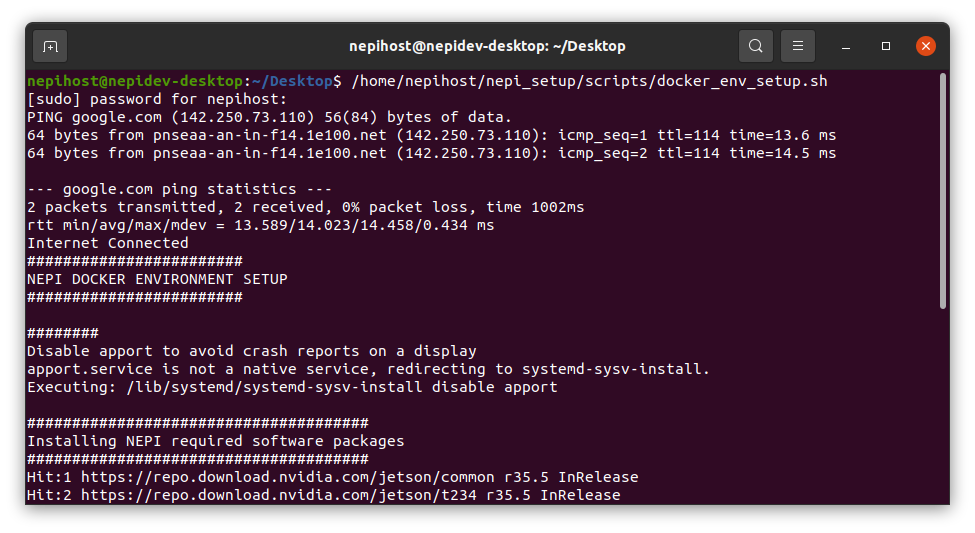
4) Run the NEPI Docker Lite Environment setup script (sudo password is 'nepi'):
source /home/nepihost/nepi_setup/scripts/docker_lite_env_setup.sh
NOTE: For all password inputs, the text will be invisible, press enter after typing password.
NOTE: If prompted enter: 'y' or 'yes':
NOTE: This step can take around ~10 minutes to load.
Start Screen:
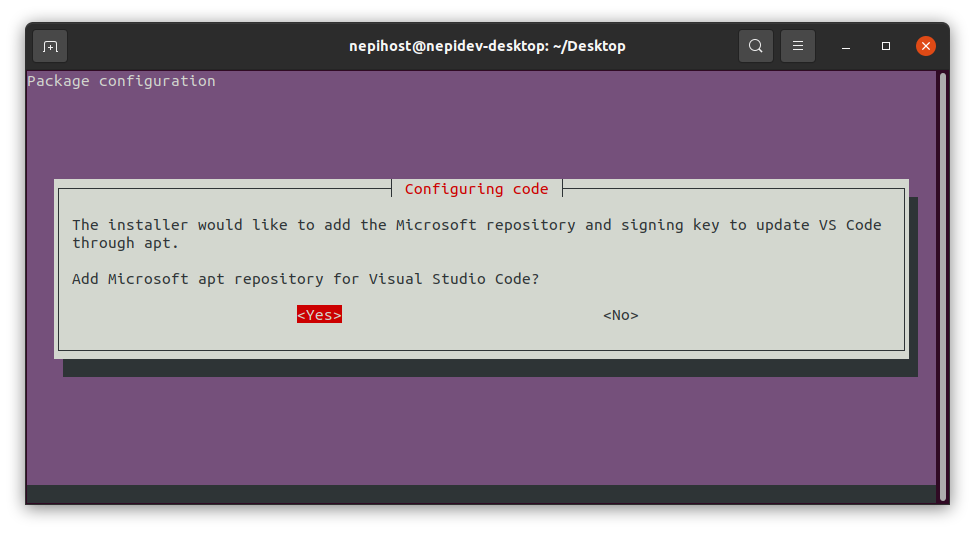
NOTE: If you get a 'System program problem detected' popup, select 'Cancel' to dismiss it.

NOTE: If you get a 'Configuration Code' popup, select 'Yes' and enter to continue.
End Screen:

5) Once the script completes, scroll through the terminal output and verify there are no errors.
6) POWER CYCLE your system when complete.
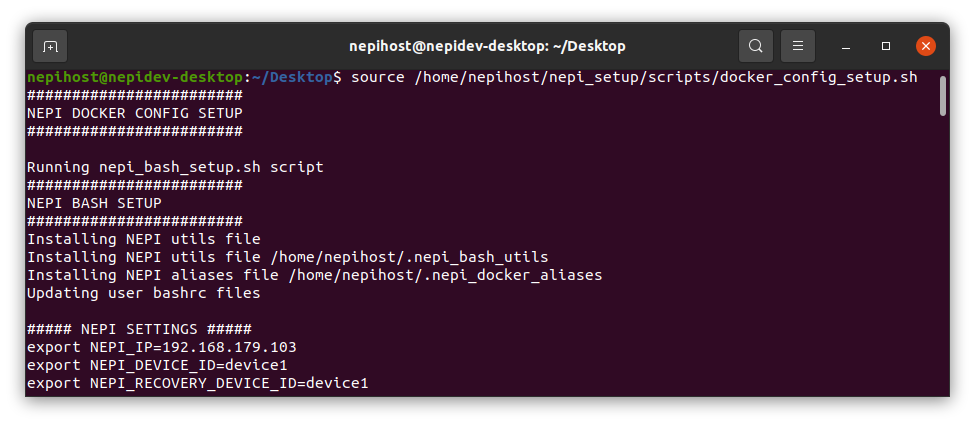
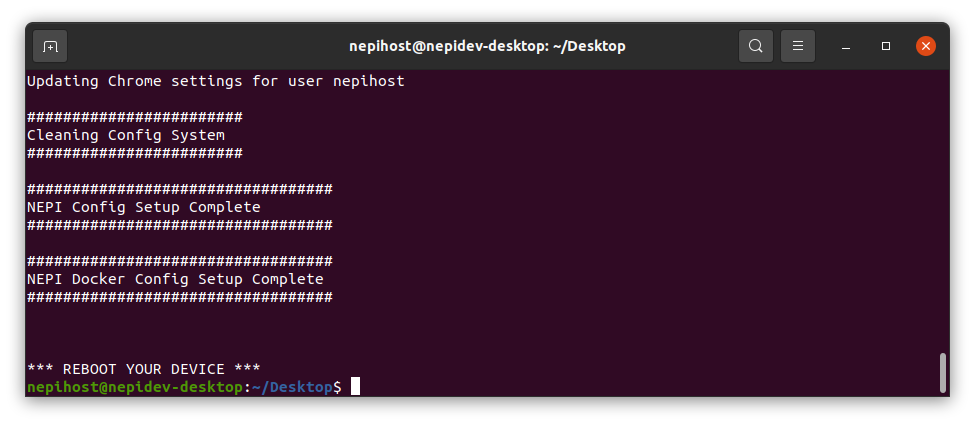
NEPI Docker Config Setup
This section will configure the NEPI Docker configuration using the default settings. You can change settings later in the 'NEPI Docker Customization' section.
1) Log into the nepihost account (sudo password is 'nepi')
2) Run the NEPI Docker Lite Configuration setup script (sudo password is 'nepi'):
source /home/nepihost/nepi_setup/scripts/docker_lite_config_setup.sh
Start Screen:

End Screen:

3) POWER CYCLE your system when complete.
NOTE: After this process, the following changes will be made:
- Desktop background and sidebar applications menu updates.
- NEPI bash alias and util functions added to user bash profile.
- NEPI folder shortcuts added to File Manager folder bookmarks.
- Chromium browser updated with useful NEPI browser bookmarks.
- The NEPI Docker install instructions file is added to the Desktop.
NOTE: This process will create the following NEPI Folders:
- NEPI Storage folder created at '/mnt/nepi_storage', along with several user subfolders. This is where NEPI processes store user files such as: Saved Data, AI models, Import/Export Docker Images, and User Saved Configurations.
- NEPI Docker folder created at '/mnt/nepi_docker', This is where NEPI Docker Images are stored.
- NEPI Config folder created at '/mnt/nepi_config', along with several config subfolders.
NEPI Docker Lite Init Setup
This section will initialize and test your NEPI Docker solution. You can change settings later in the 'NEPI Docker Customization' section.
1) Log into the nepihost account (sudo password is 'nepi')
2) Check for internet connection:
ping -c 1 google.com
3) Run the Docker Lite Initialization script (sudo password is 'nepi'). If prompted enter: 'y' or 'yes':
source /home/nepihost/nepi_setup/scripts/docker_lite_init_setup.sh

4) Run the NEPI Docker Import command (sudo password is now 'nepi'):
nepiimport
5) After the initialization script completes, you can view and print the installed NEPI Docker Images by typing:
dimg
NOTE: This process downloads the Lite AI models, AI training scripts, sample data files, and user_configurations to folders in /mnt/nepi_storage.
NOTE: This process downloads the latest NEPI Docker Image for your system's architecture NEPI Docker's import folder at /mnt/nepi_storage/nepi_images.
NEPI Docker Image Testing
This section verifies that the NEPI Docker container runs successfully and that the NEPI Resident User Interface (RUI) launches correctly.
1) Start your NEPI container running:
nepistart
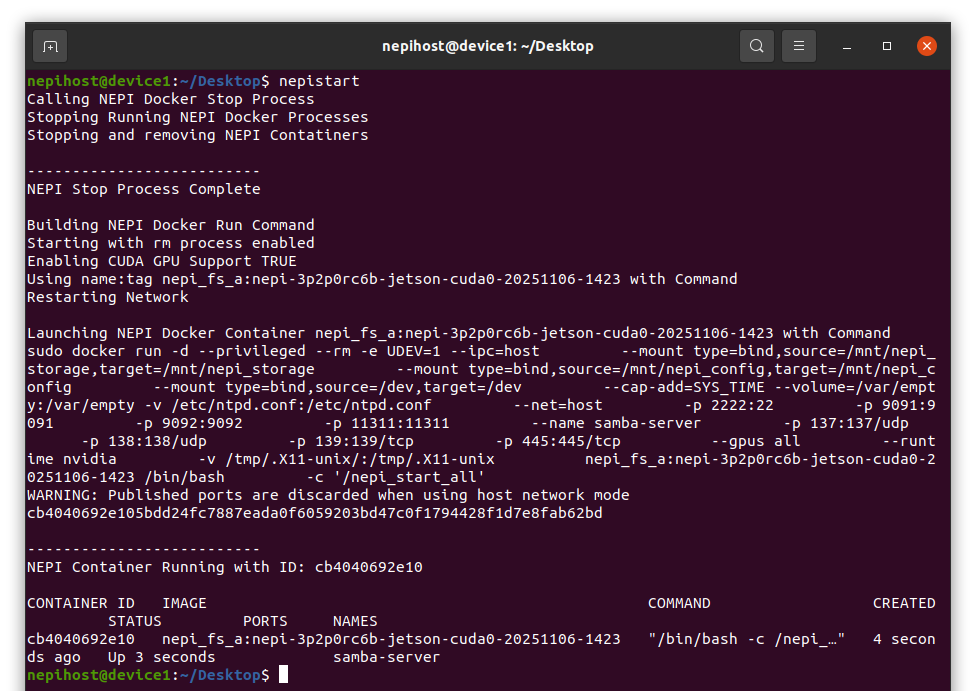
2) Wait for the startup confirmation message.
NOTE Newly installed NEPI Docker Images may take several attempts to start successfully the first time after installation. Try running several times if it fails
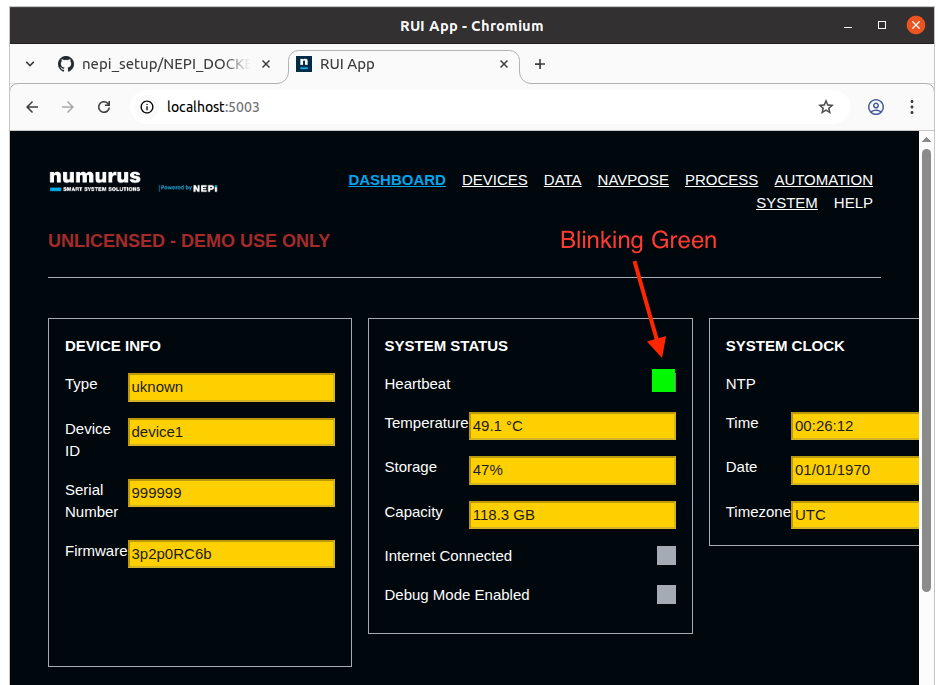
3) Open Chromium browser. Check that the NEPI Resident User Interface (RUI) is running by opening the Chromium browser tab and entering the following in the URL search bar:
localhost:5003
4) Confirm that the NEPI RUI dashboard loads and shows a blinking green indicator, signaling that the core NEPI software system is running and that NEPI is active.
NOTE: RUI Controls related to User, Device, Time, Network, and Software management require the NEPI Docker service running.
NEPI Docker Service Setup
This step enables NEPI to automatically start whenever the system boots, so you don't have to manually start it each time.
1) Enable NEPI Docker service:
nepienable
NOTE: You can disable the NEPI Docker Service with 'nepidisable'

2) POWER CYCLE your system when complete.
3) Log back into nepihost (sudo password is 'nepi').
4) Verify that your NEPI Container is running after reboot:
dps
NOTE:If your container is not running, try to debug NEPI Docker Service issues with the following commands:
nepirestart
nepistatus
nepilogs
NEPI Docker IP Configuration
If you want to connect to your NEPI device from a network connected PC, setup and test a remote connection following these instructions
Additional Resources
If this is your first time setting up NEPI Docker, it is highly recommended that you read through the "NEPI Docker Installation Notes" section on the official GitHub setup guide: NEPI Docker Host Setup Instructions on GitHub.
If you encounter any issues starting and running the NEPI Software container, see the debugging steps in the "NEPI Docker Debugging" section at the bottom of this page: https://github.com/nepi-engine/nepi_setup/blob/main/NEPI_DOCKER_LITE_SETUP.md
For additional support, visit the NEPI Software Community Forum at: NEPI Community
Debugging Troubleshooting
If your container is not running, try to debug NEPI Docker Service issues with the following commands:
nepirestart
nepistatus
nepilogs
For detailed debugging instructions, logs, and advanced troubleshooting steps, refer to the official GitHub setup guide: NEPI Docker Host Setup Instructions on GitHub.
NEPI Software Shortcut Functions
View all NEPI Docker command-line shortcuts anytime by typing:
nepihelp
NEPI Docker Local PC Connections
In this step, you will configure your NEPI device's IP address to allow local PC's to find and communicate with with the device. ]
1) Open the Settings app and navigate to the Network Settings page. You can also click the "Show Applications" button at the bottom-left corner of your screen, search for the "Settings" application, and launch it from there.
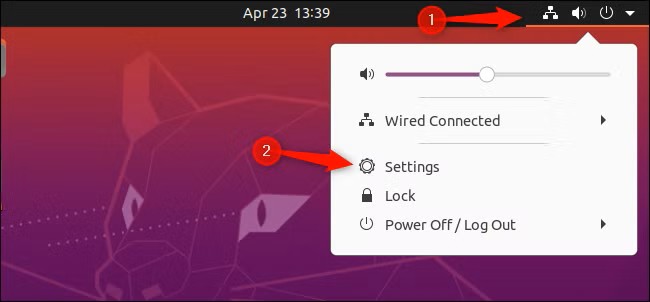
2) Select your Wired connection. Click the gear icon to edit the connection.
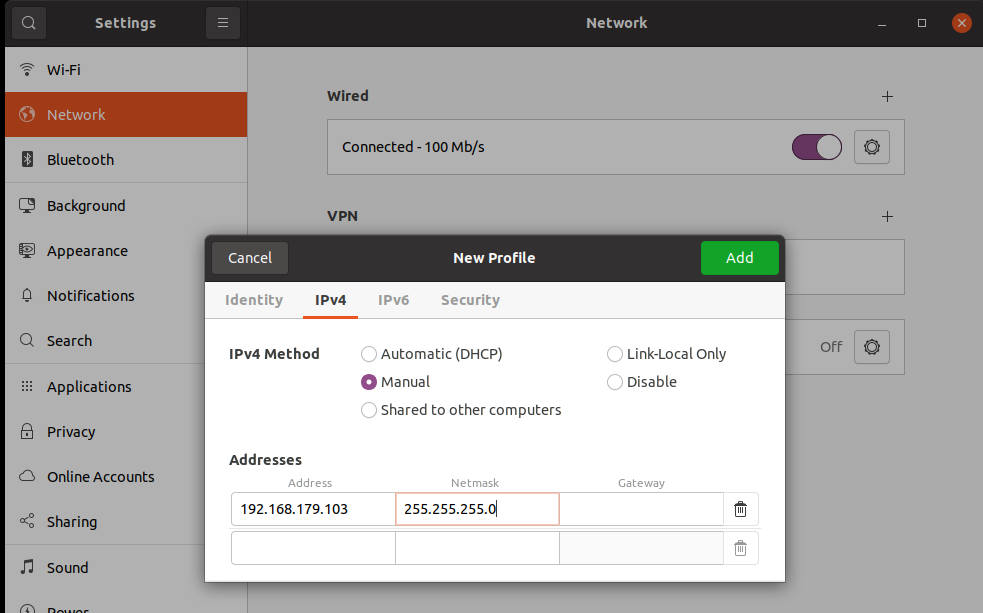
3) Go to the IPv4 tab and set IPv4 Method to Manual.
4) Add an address with the following values:
Address: 192.168.179.103
Netmask: 255.255.255.0
5) Click Add or Save, then close the settings window.
6) Reboot your NEPI device
Your device is now configured with a static IP address and ready for the next step.
NEPI Docker Camera and AI Detection Test
If you want connect a camera and run an AI model on the camera's video stream follow the instruction in the following 'Using NEPI' tutorial: https://nepi.com/tutorials/connecting-a-camera-to-an-ai-detector/
NTP Time Servers
NEPI Engine - Configuring NTP Time Syncing
Introduction
This tutorial covers connecting and configuring an NTP server running on a locally network connected PC with a NEPI devices' onboard time management system, which will automatically update your NEPI devices clock when both devices are connected on the network.
What you will need
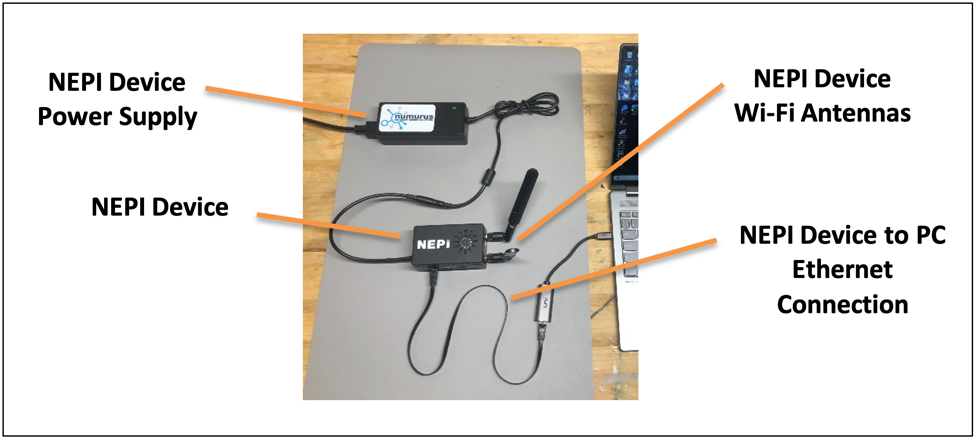
1) 1x NEPI-enabled processor device and power supply.
2) 1x PC with Ethernet network adapter
3) 1x Ethernet Cable
Hardware Setup
1) Connect the NEPI device to your PC's Ethernet adapter using an Ethernet cable, then power your NEPI device.
PC Setup
Network Adapter Configuration
On the PC, you will need to configure the Ethernet network adapter with a static IPV4 address on the same subnet that your NEPI device following the steps below. The NEPI software uses a default subnet of 192.168.179.0/24 with the device configured for IP address 192.168.179.103.
Example: PC Network Adapter Settings
IP Address: 192.168.179.5
Submask 255.255.255.0
NTP Server Setup
On the PC, you will need to install and start an NTP Server. The process varies based on the operating system your PC is running as described below.
Linux Operating Systems
1) With your PC connected to the internet, open a terminal and run the following commands:
sudo apt-get install ntp
service ntp start
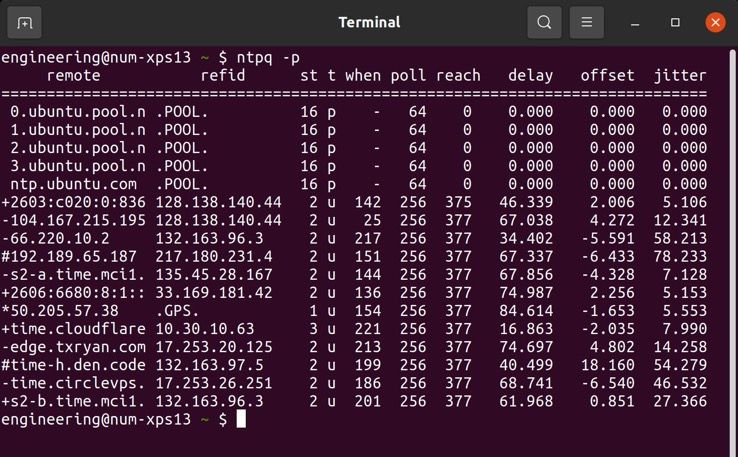
2) Check that the NTP server is running by typing
ntpq -p
You should see something like this
For additional information, take a look at: https://www.tekopolis.com/configuring-ntp-linux-client/
Windows Operating System
1) Instructions for setting up an NTP server on a Windows PC can be found at: https://support.hanwhavision.com/hc/en-us/articles/26570683589529-How-to-Setup-an-NTP-Server-on-Windows-10
NEPI Device Setup
By default, NEPI looks for and will connect to a local NTP server broadcasting on IP address 192.168.179.5.
Adding Additional NTP Connections
Additional NTP server IP addresses can be added or removed by publishing the IP address to the ROS topics "add_ntp_server" and "remove_ntp_server".
1) To add an NTP server IP address to your NEPI device's NTP search addresses, open an SSH connected terminal to your nepi device and enter the following commands:
rostopic pub /nepi/s2x/add_ntp_server std_msgs/String "data: 'IP_ADDRESS_TO_ADD'"
NOTE: If your NTP server is on a subnet other than "192.168.179", you will need to add the NTP's server's subnet to your NEPI device's IP addresses. See the "NEPI Ethernet Setup" section in "NEPI Engine - Connecting and Setup" tutorial for instructions on adding additional IP addresses to your NEPI device at: https://nepi.com/nepi-tutorials/nepi-engine-connecting-and-setup/
2) To remove an NTP server IP address to your NEPI device's NTP search addresses, open an SSH connected terminal to your nepi device and enter the following commands:
rostopic pub /nepi/s2x/remove_ntp_server std_msgs/String "data: 'IP_ADDRESS_TO_REMOVE'"
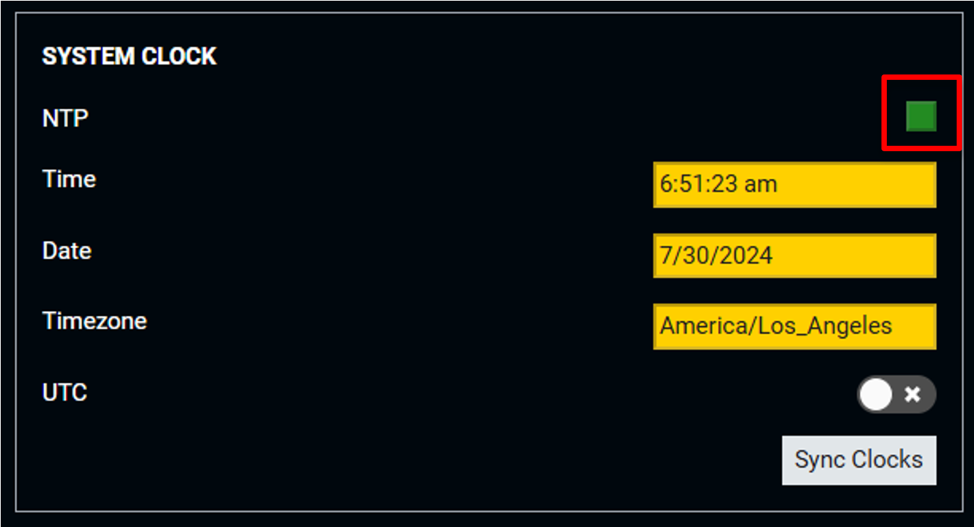
Check your NEPI NTP Connection
You can check that your NEPI device is connected to your PC's NTP server by opening the NEPI device's RUI Dashboard tab and verifying that the "NTP" indicator is green.
NOTE: It can take several seconds for the indicator to update after opening the RUI Dashboard tab.
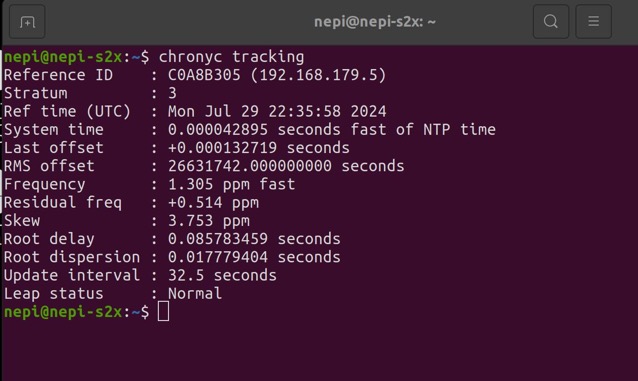
You can find additional information about your NEPI Device's NTP connections by opening an SSH connected terminal to your NEPI device and typing:
chronyc tracking
You should see something like this.
NEPI Docker Full Setup
This tutorial walks you through setting up, configuring, and running the full NEPI Docker container on a suitable edge processor. This is a more comprehensive setup than Docker Lite and is recommended for production deployments.
What you will need
1) 1x A monitor, keyboard, and mouse connected to the host system.
NEPI Docker User Setup
This section creates the nepihost user account and prepares your device to install NEPI Docker by cloning the NEPI setup repository that contains the required installation scripts.
1) Log into a user account with Administrator privileges, or use the existing nepihost account if available.
2) Open a Terminal window: right-click the desktop / Open in Terminal
3) Confirm your system has internet access by running the following command:
ping -c 1 google.com

4) Update Git application (sudo password is '#Nsetup4You'):
sudo apt update && sudo apt install -y git

5) Clone the NEPI setup repository:
cd /home/${USER}
git clone https://github.com/nepi-engine/nepi_setup.git

6) Run the NEPI Docker user setup script (sudo password is '#Nsetup4You'):
cd /home/${USER}/nepi_setup/scripts
sudo su
Then:
./docker_user_setup.sh

7) Power cycle your system when complete to apply the new settings.
NEPI Docker Environment Setup
This section will set up the NEPI Docker required software environment.
1) Log into the nepihost account created in Docker User Setup (sudo password is now 'nepi').
2) Run the NEPI Docker environment setup script (sudo password is 'nepi'). If prompted enter: 'y' or 'yes':
/home/nepihost/nepi_setup/scripts/docker_env_setup.sh

NOTE: If you get a 'System program problem detected' popup, select 'Cancel' to dismiss it.

3) Once the script completes, scroll through the terminal output and verify there are no errors.
4) Power Cycle your system when complete.
NEPI Docker Config Setup
This section will configure the NEPI Docker configuration using the default settings.
1) Log into the nepihost account (sudo password is 'nepi').
NOTE: To enable remote file access through NEPI's built-in Samba network drive sharing, you must first create and mount the following folders as separate partitions:
/mnt/nepi_config- minimum 200 MB/mnt/nepi_storage- minimum 20 GB
Create these partitions before running the next setup step.
2) Run the NEPI configuration setup script (sudo password is 'nepi'):
source /home/nepihost/nepi_setup/scripts/docker_config_setup.sh
This process will create the following NEPI Folders:
- NEPI Storage folder created at
'/mnt/nepi_storage', along with several user subfolders for saved data, AI models, import/export Docker images, and user saved configurations. - NEPI Docker folder created at
'/mnt/nepi_docker'for storing NEPI Docker Images. - NEPI Config folder created at
'/mnt/nepi_config', along with several config subfolders.
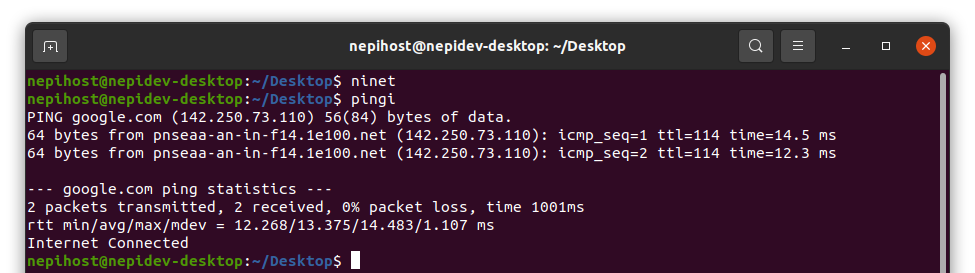
3) Test that you can reconnect to the internet and sync clocks:
ninet
4) Check for internet connection:
pingi
5) Power Cycle your system when complete.
NEPI Docker Init Setup
This section will initialize and test your NEPI Docker solution.
1) Log into the nepihost account (sudo password is 'nepi').
2) Enable internet connection and sync clocks:
ninet
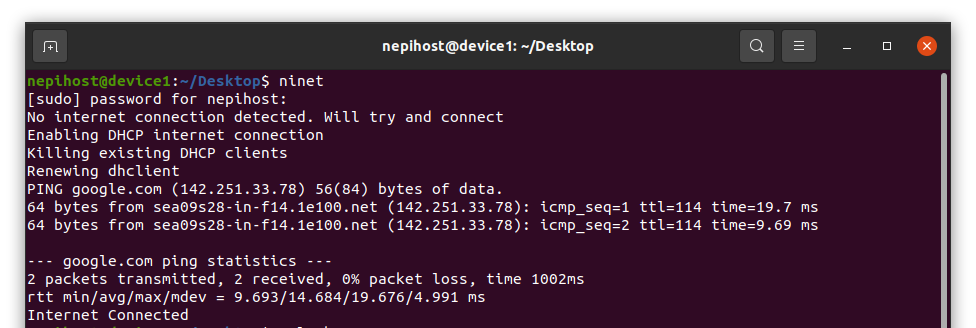
3) Check for internet connection:
pingi

4) Run the Docker storage initialization script (sudo password is 'nepi'). If prompted enter: 'y' or 'yes':
source /home/nepihost/nepi_setup/scripts/docker_storage_init.sh
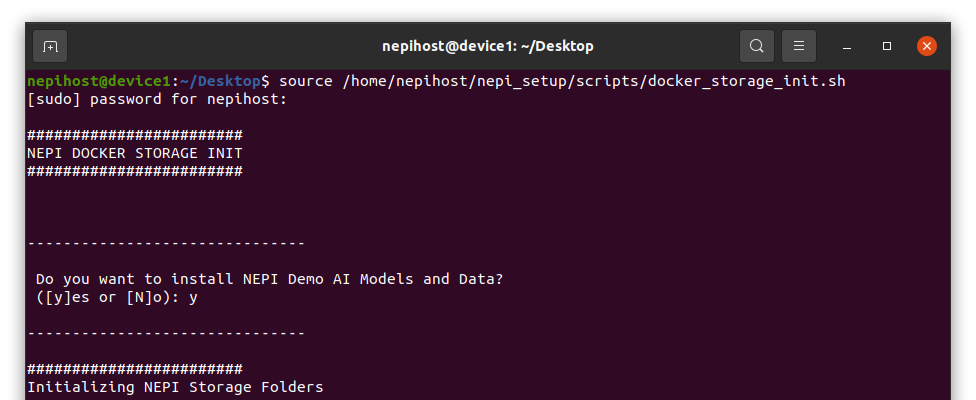
5) Initialize the NEPI Docker image installation:
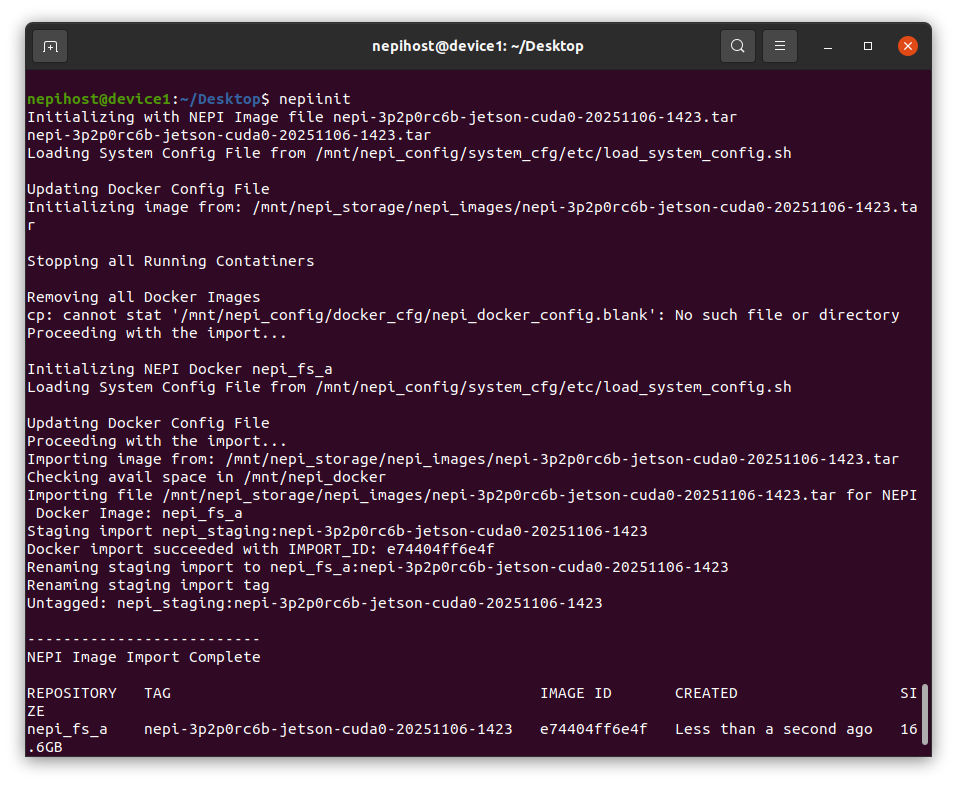
nepiinit
The script will display the NEPI images currently installed.
NEPI Docker Image Testing
This section verifies that the NEPI Docker container runs successfully and that the NEPI Resident User Interface (RUI) launches correctly.
1) Start your NEPI container running:
nepistart

2) Wait for the startup confirmation message.
3) Open Chromium browser and enter: localhost:5003
4) Confirm that the NEPI RUI dashboard loads and shows a blinking green indicator, signaling that NEPI is active.

NEPI Docker Service Setup
This step enables NEPI to automatically start whenever the system boots.
1) Enable NEPI Docker service:
nepienable

2) Power Cycle your system when complete.
3) Log back into nepihost (sudo password is 'nepi').
4) Verify that your NEPI Container is running after reboot:
dps
Debugging and Shortcuts
If your container is not running, try to debug NEPI Docker Service issues with the following commands:
nepirestart
nepistatus
nepilogs
For detailed debugging instructions, refer to the official GitHub setup guide: NEPI Docker Host Setup Instructions on GitHub.
View all NEPI Docker command-line shortcuts anytime by typing:
nepihelp