AI Application
Introduction
This tutorial covers NEPI Engine's built-in AI application which supports loading AI models from NEPI's on-board AI model library and connecting to available image streams.
What you will need
1) 1x NEPI-enabled device with internet access. This tutorial uses an edge-compute processor box that includes an NVIDIA Jetson Xavier NX embedded GPU module with NEPI Engine software installed.
NOTE: See available off-the-shelf NEPI enabled edge-compute options at: /hardware/
2) 1x PC with internet access and configured to access the NEPI device's RUI browser-based interface and user storage drive. This tutorial uses a Windows 11 PC and a USB GigE Ethernet adapter and Ethernet cable.
NOTE: Instructions for configuration a PC and connecting to a NEPI device's RUI and user storage drive are provided in the NEPI Engine Getting Started tutorial at: https://nepi.com/nepi-tutorials/nepi-engine-connecting-and-setup/
3) 1x NEPI IDX supported 2D camera. This tutorial uses a USB webcam camera.
NOTE: See the NEPI Engine Hardware Interfacing tutorial "Imaging Sensors" for details on connecting a camera to your NEPI device at: https://nepi.com/tutorials/
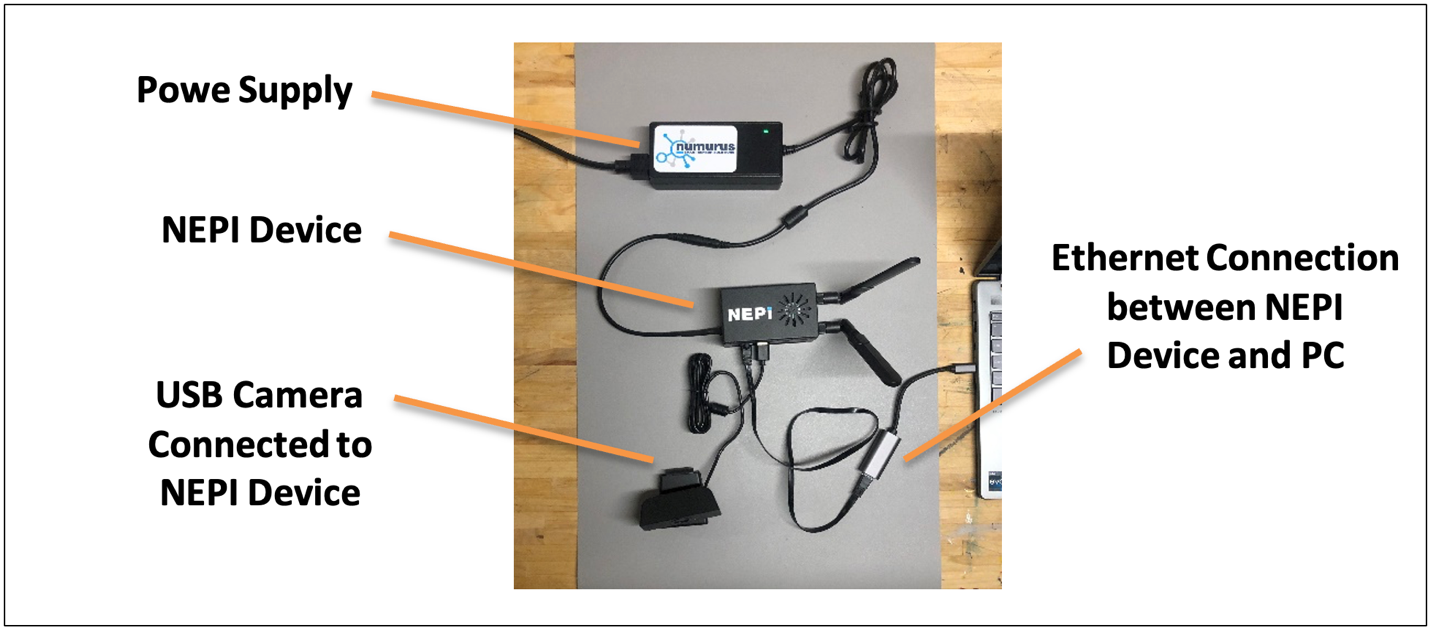
Hardware Setup
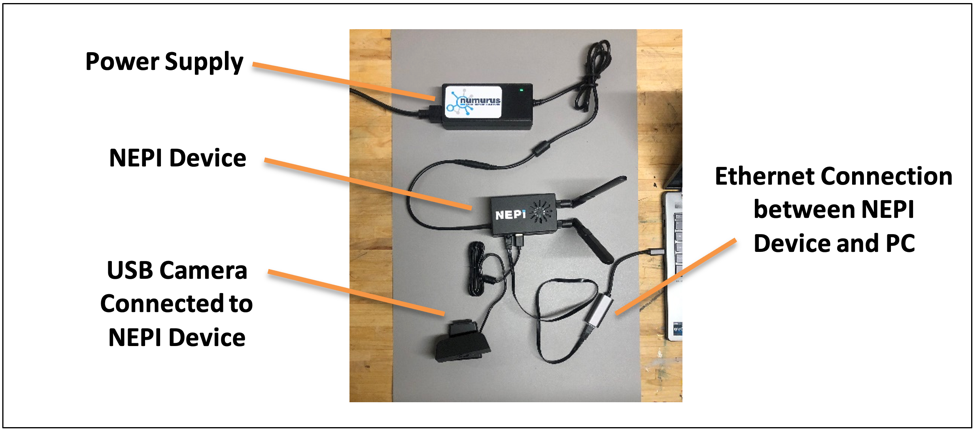
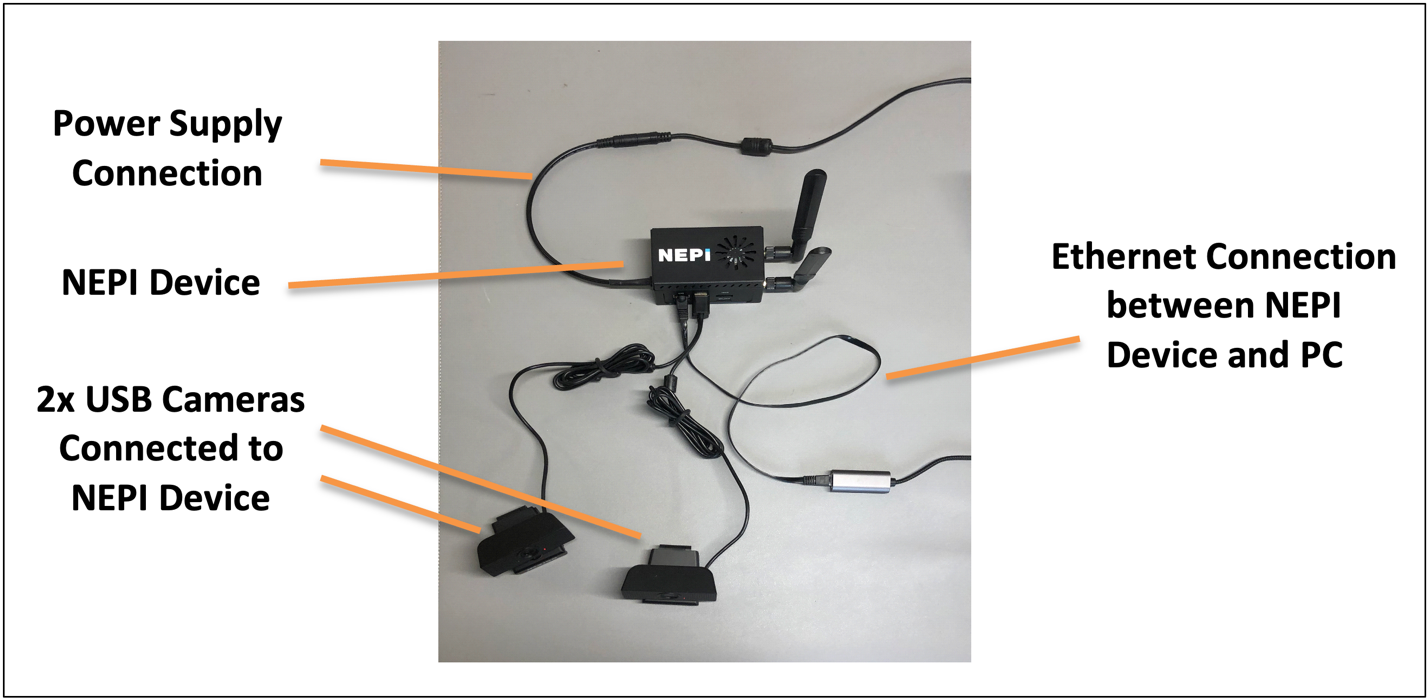
1) Connect the NEPI IDX driver supported camera to your NEPI device.
2) Connect the NEPI device to your PC's Ethernet adapter using an Ethernet cable, then power your NEPI device.
Loading and Running an AI Model
In this section we will show how to load an AI models from NEPI's on-board AI model library, and connect it to an image stream being produced by a connected camera using NEPI's built-in AI application.
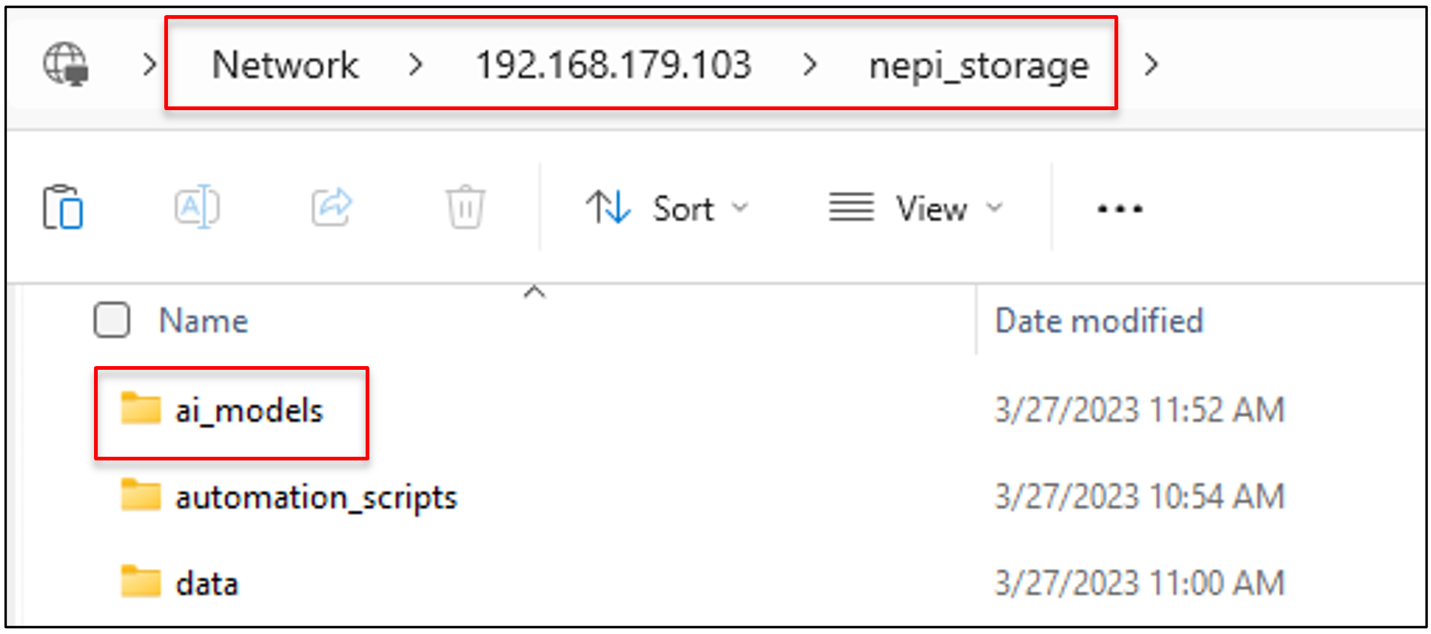
NOTE: This AI application tutorial assumes you have at least one AI model loaded into your NEPI device's on-board AI model library located on the NEPI device's user storage drive in a folder called "ai_models". To download the example AI models used in this tutorial, visit: https://www.dropbox.com/scl/fo/iep3i08frjlnthesyqeez/h?rlkey=lzrkvoheqglgtdezggvsra0vo&dl=0
For more information on deploying AI models onto your NEPI device see the NEPI AI Management System manual available at: https://nepi.com/documentation/nepi-engine-ai-management-system/
and NEPI Engine Custom AI Model Development tutorial available at: https://nepi.com/tutorials/
1) On your PC, open your NEPI device's RUI and select the APPLICATIONS/AI tab from the top menu to open the NEPI AI application.
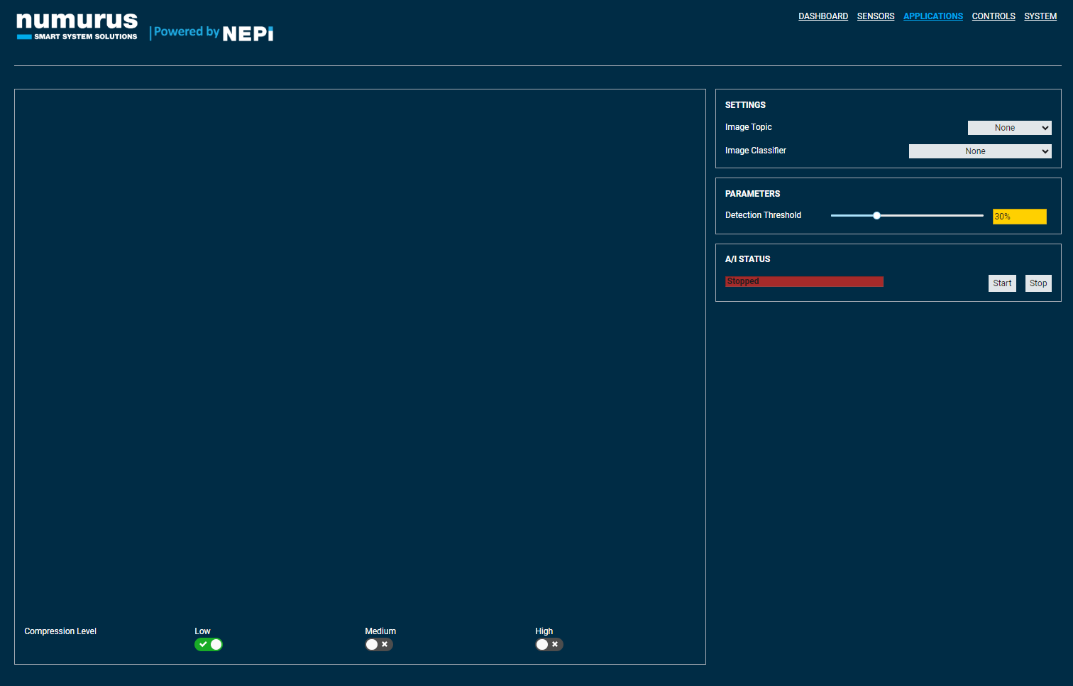
2) On the AI application page, there is an image view pane on the top left. On the top right of the page, there are dropdown menus for choosing the image source you want to feed into your AI model and the AI model you want to load from the on-board AI model library, selector dropdown boxes. Below the AI model selector dropdown is a slider that adjusts the detection threshold at which AI model detections are used based on the confidence value of each detection. After setting these three parameters, press the "Start" button to load the selected model and connect it to the selected image topic.

3) Once your AI model loads and connects to the selected image stream, you will see the detection data overlaid on the input image in the image viewing pane.

NOTE: In addition to this detection image output stream, the AI application produces a ROS bonding box message with all the detection details for downstream applications such as automation scripts or controls systems to use the AI detection results.
Automation Application
Introduction
This tutorial covers NEPI Engine's built-in AI application that supports loading and monitoring automation scripts from NEPI's on-board automation script library. This tutorial also covers methods for debugging issues with your automation scripts if they are not running properly.
Script File Name Conventions
In order to maximize script reuse, NEPI example automation scripts are created as primitives that can be used together to quickly create custom application solutions. The following table provides descriptions of NEPI example script primitive naming convention based on primitive functions.
NEPI Primitive Functions Table
|
Function |
Description |
|
startup |
Scripts that automate starting and stopping groups of scripts for a given application or solution. |
|
mission |
Scripts that perform an overall mission or solution automation. Mission scripts usually depend on many other scripts running. |
|
action |
Scripts that take some action based on either a direct sensor output or the output of another running script. |
|
process |
Scripts that take in data directly from a sensor or the output of another running script, process that data, and publish the processed for consumption by other running scripts. |
|
config |
Scripts that configure the NEPI system's built in functionality. Config script may use the output data of other running scripts as part of this configuration. |
|
driver |
Scripts that provide driver level interfacing to attached sensors, lights, actuators, and control systems. |
The general file name convention used for NEPI example automation scripts is:
- <Hardware or Application Description>_<Primitive Function>_script
Example:
The NEPI example script that automates configuring AI model and a specific image input topic is named:
- ai_detector_config_script.py
In addition, "startup" type scripts are proceeded with an underscore to help organize them at the top any alphabetically ordered automation script list.
Example:
The NEPI example script that automates starting a group of automation scripts to look for a specific object centered in an image and send a system wide "snapshot" event trigger is named:
- _object_detect_and_snapshot_startup_script.py
For more details on NEPI's Automation Management System, see the NEPI Engine - Automation Manager guide available at: https://nepi.com/documentation/
What you will need
1) 1x NEPI-enabled device. This tutorial uses an edge-compute processor box that includes an NVIDIA Jetson Xavier NX embedded GPU module with NEPI Engine software installed.
NOTE: See available off-the-shelf NEPI enabled edge-compute options at: /hardware/
2) 1x PC with internet access and configured to access the NEPI device's RUI browser-based interface and user storage drive. This tutorial uses a Windows 11 PC and a USB GigE Ethernet adapter and Ethernet cable.
NOTE: Instructions for configuration a PC and connecting to a NEPI device's RUI and user storage drive are provided in the NEPI Engine Getting Started tutorial at: https://nepi.com/nepi-tutorials/nepi-engine-connecting-and-setup/
3) 1x NEPI IDX supported 2D camera. This tutorial uses a USB webcam camera.
NOTE: See the NEPI Engine Hardware Interfacing tutorial "Imaging Sensors" for details on connecting a camera to your NEPI device at: https://nepi.com/tutorials/
Hardware Setup
1) Connect the NEPI IDX driver supported camera to your NEPI device.
2) Connect the NEPI device to your PC's Ethernet adapter using an Ethernet cable, then power your NEPI device.
Loading and Editing Automation Scripts
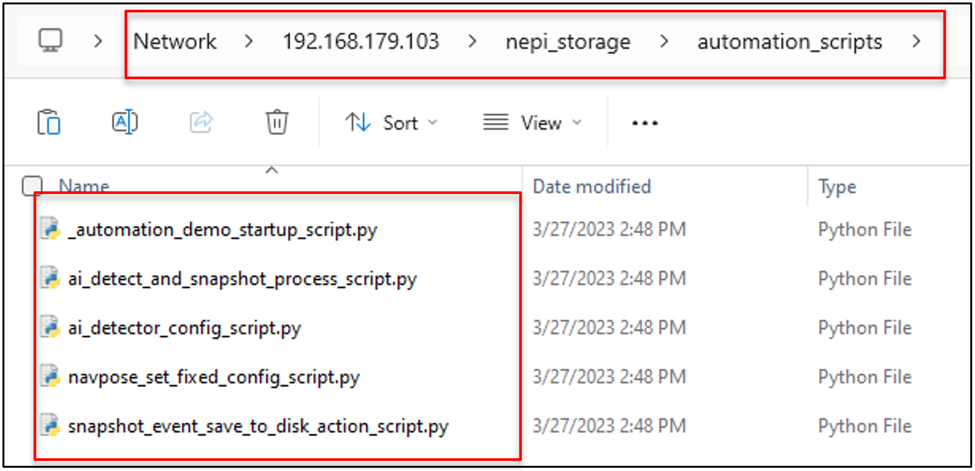
In this section we will show how to load and edit automation scripts from NEPI's on-board automation script library located on your NEPI device's user storage drive at:
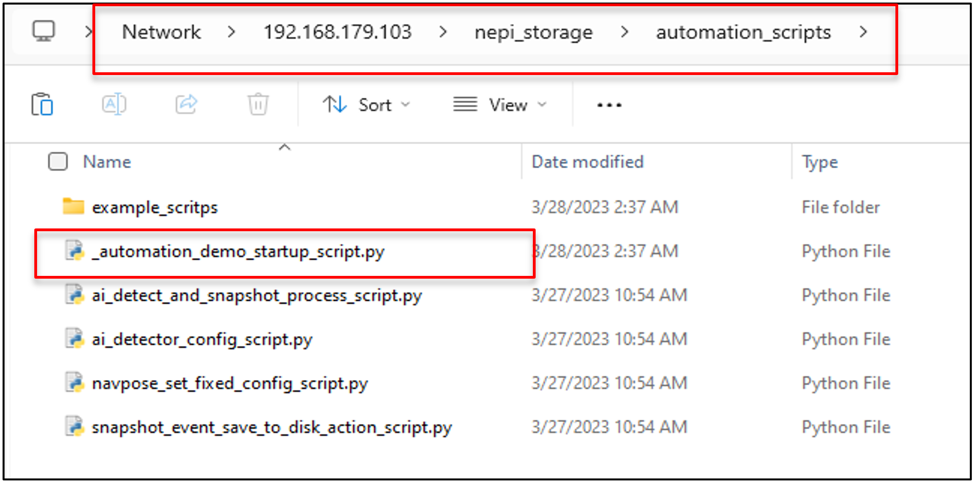
\\192.168.179.103\nepi_storage\automation_scripts\
NOTE: To download the example automation scripts used in this tutorial, visit: https://www.dropbox.com/scl/fo/iep3i08frjlnthesyqeez/h?rlkey=lzrkvoheqglgtdezggvsra0vo&dl=0
or download the complete set of available automation script example files from the NEPI automation script GitHub repo at: https://github.com/numurus-nepi/nepi_sample_auto_scripts
You can put all your downloaded scripts in a subfolder called "example_scripts" in your automation script library folder to keep them separated from your working scripts that must be located in the "automation_scripts" folder on your NEPI devices user storage drive.
1) Copy the automation scripts you want to run into your NEPI device's on-board automation script library located on the NEPI device's user storage drive in a folder called "automation_scripts".
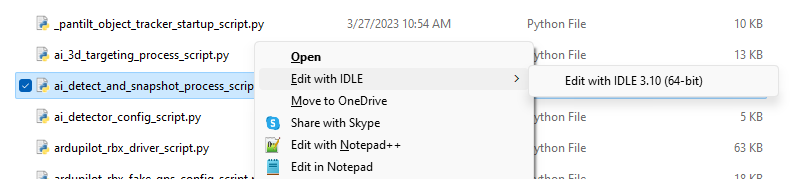
2) You can edit any of the automation scripts in the NEPI automation script library folder by right clicking on it and opening it with a text or code editor. We will use python Idel editor for this tutorial.
3) Each script should have a description section just below the license section at the top of the script that provides details about the script including any other script dependencies it might have.
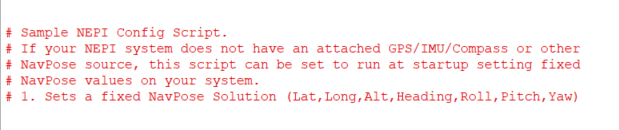
As well as a User Settings section with common settings you may want to modify.
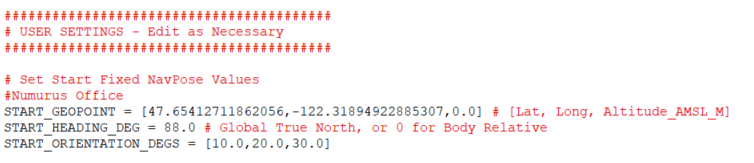
In most cases, these scripts should work as-is, but feel free to modify scripts as needed for your application goals.
4) Save the file.
Manually Running Automation Scripts
In this section we will show how to manually start and stop automation scripts loaded into your NEPI device's on-board automation script library using NEPI's built-in Automation application.
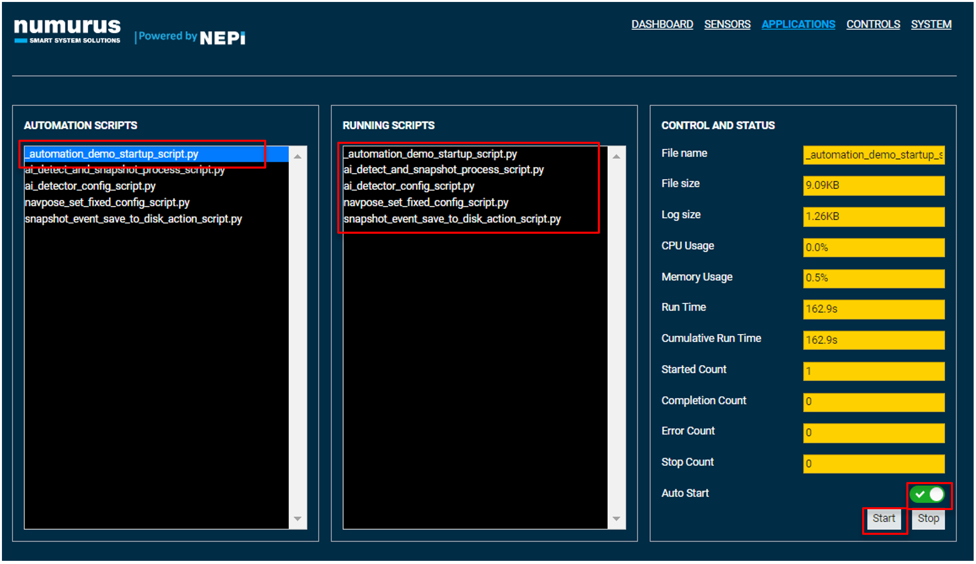
1) On your PC, open the NEPI device's RUI and select the APPLICATIONS/AUTOMATION tab from the top menu to open the NEPI Automation application.
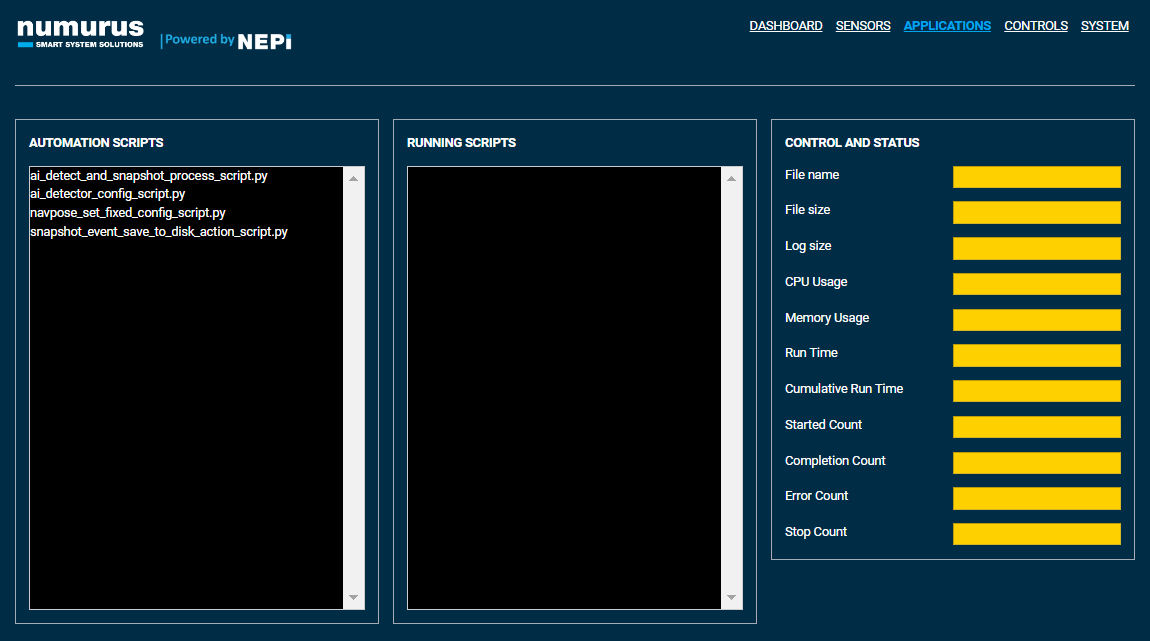
2) You can see all the scripts currently loaded in your NEPI device's on-board automation script library in the left "Automation Scripts" pane. You can run and monitor each script by selecting it and pressing the "Start" button on the bottom left of the page to start the script. You can also enable the "Auto Start" switch for any scripts you want to start automatically on bootup. You can monitor process information on each running script by selecting it in the left pane and viewing the status information in the right side "Control and Status" pane.
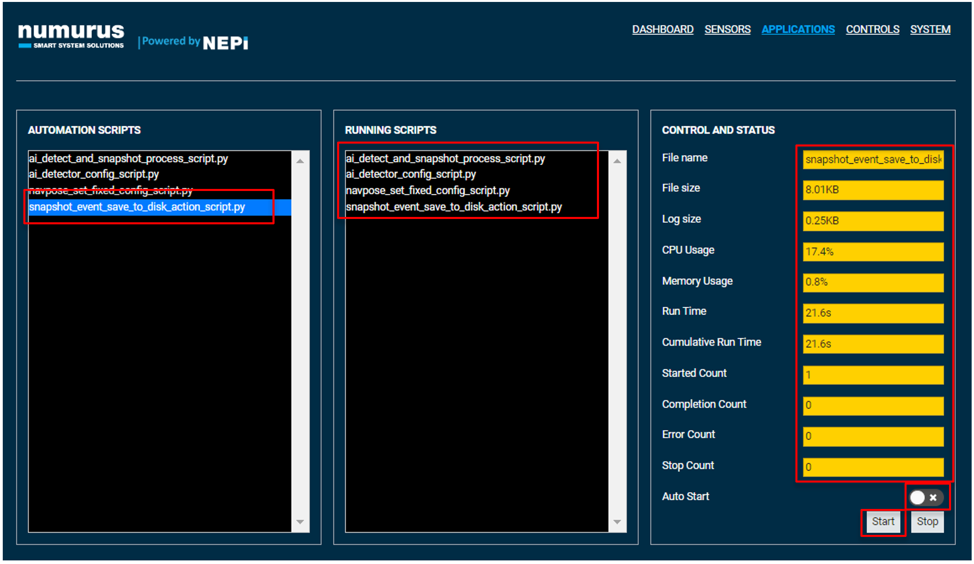
For this tutorial, we have loaded and started the following automation scripts:
1. navpose_set_fixed_config_script which configures NEPI's navpose solution with values set in the script,
2. ai_detector_config_script that loads an AI detector model and connects it to an available image stream.
3. ai_detect_and_snapshot_process_script that starts a process that sends a snapshot trigger event message when a specific object is detected in the center of the image.
4. snapshot_event_save_to_disk_action_script that saves data to disk when a snapshot trigger event message is received.
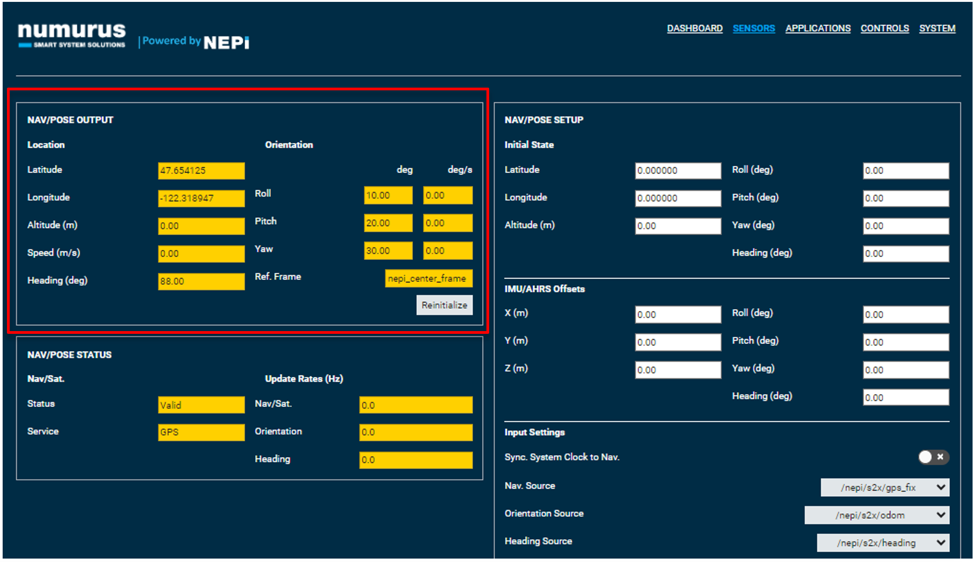
3) You can check that the navpose_set_fixed_config_script worked by opening RUI Sensors/NavPose page and checking that our NEPI's current NavPose solution matches what we set in the navpose_set_fixed_config_script file.
4) You can check that our ai_detector_config_script has properly loaded and connected the AI model and input stream we configured in the script by opening the RUI APPLICATIONS/AI page and checking that an AI detector process has started with the AI model and input image stream that were set in the script's User Settings section.

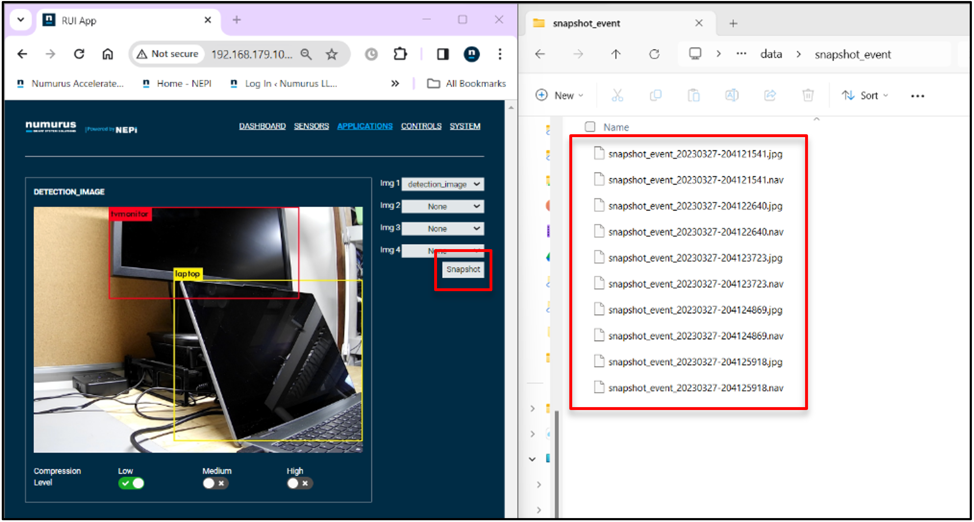
5) We can check that our ai_detect_and_snapshot_process_script and snapshot_event_save_to_disk_action_script are functioning as expected by setting up a split screen with the NEPI device's RUI APPLICATION/IMAGE VIEWER page on the left and a File Manager application connected to our NEPI device's user storage data drive on the right. In the data drive, you should see a new folder called "snapshot_event" that the snapshot action script created. Go ahead and open that folder.
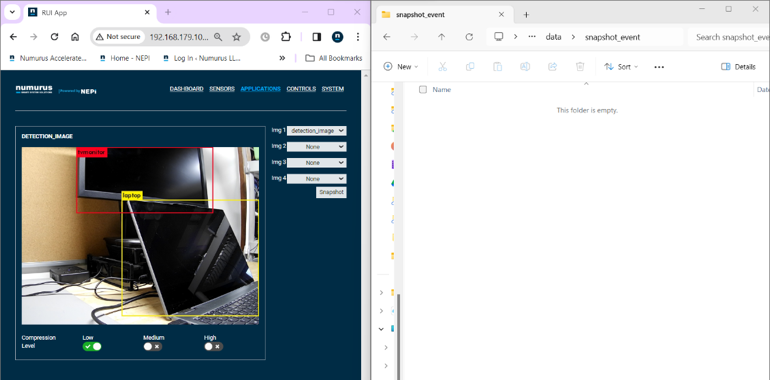
Next, click the Snapshot button in the Image Viewer window to manually create a snapshot event trigger that our snapshot_event_save_to_disk_action_script process should catch and save some data in the folder.
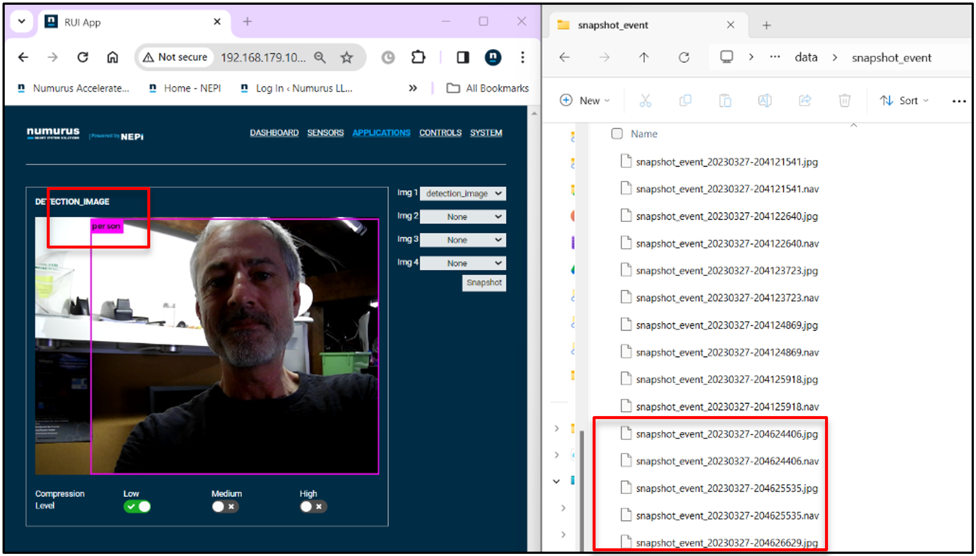
Next, point the camera at a person which our ai_detect_and_snapshot_process_script, which monitors the output of our running AI detector, will send a snapshot trigger if an object of type "person" is detected in the center of the image. Our snapshot_event_save_to_disk_action_script process should catch and save some data in the folder.
Automating Script Startup
Starting and stopping each automation script manually works ok if you only have a couple automation scripts and a single solution you need to run, but if you have a large number of scripts and several automation solutions combinations you want to be able to start up for different applications, it is a good idea to use NEPI automation startup scripts that automatically start and stop combinations of scripts.
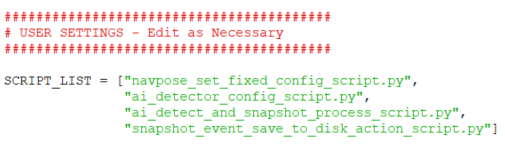
1) Copy one of the example startup scripts you downloaded from the from the tutorial or GitHub repo links in the "Loading and Editing Automation Scripts" section of this tutorial to your NEPI device's automation script library folder, and rename it an appropriate name starting with an "_" and ending with "_startup_script.py". The underscore will ensure that it is shown at the top of the automation scripts list in the NEPI Automation application, while the startup_script.py ending will identify it as a startup script. For this tutorial, we have named our startup automation script "_automation_demo_startup_script.py".
2) Open the startup script with a text or code editor, then replace the list of scripts in the SCRIPT_LIST variable in the scripts User Setting section with the list of scripts you want to automate startup for.
NOTE: Scripts will be started in the order you list them in case you want to control which scripts start first.
Save and close you startup script when complete.
3) Running this script will start any scripts automatically that were added to the startup script file's SCRIPT_LIST variable. Then if you hit the Stop button with this script selected, the startup script will close any scripts it started up before shutting itself down. You can also set this script to run on bootup by selecting it from the left pane and selecting the "Auto Start" switch.
Debugging Automation Scripts
If your script is not loading or not functioning the way you expect, there are a few easy ways to get additional information and monitoring on your running script.
NEPI Automation Script Logs
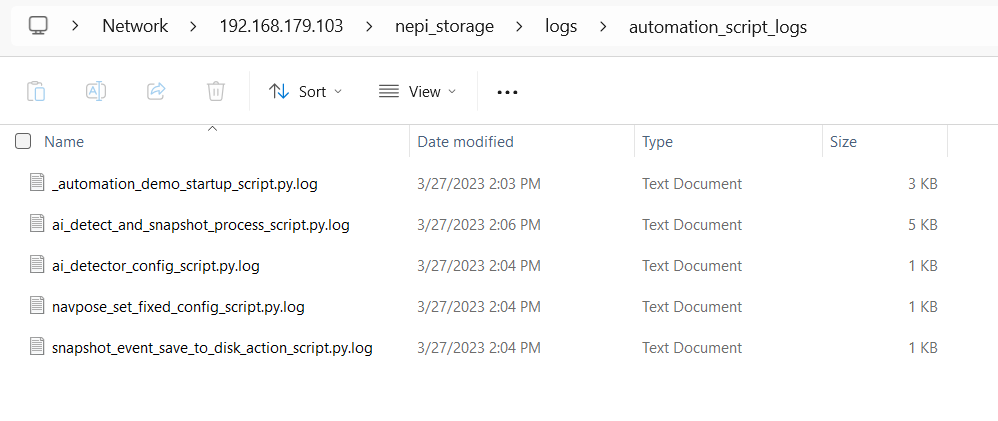
The first place to start looking at what might be happening is the NEPI automation script log files that capture print statements, code exceptions, and compiler errors on running scripts. The automation script log files are located on the NEPI device's user storage drive under the logs folder in an automation script logs subfolder. You can open any of the script logs to see the latest updates saved for that script.
1) Open a file manager to your NEPI device's automation_script_logs folder located on your NEPI device's user storage drive at: \\192.168.179.103\nepi_storage\logs\automation_script_logs
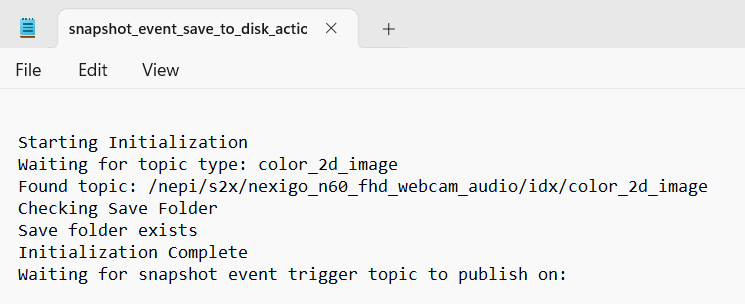
2) You should see logs for each of the scripts you have running or have run since deleting the log files in this folder. Right click on any script log you want to inspect and open with a text or code editor of your choice.
NOTE: Log files are continuously updated for running scripts, so either close and reopen the file to see the latest information or use a text editor that has auto refresh capabilities.
NEPI Command Line Tools
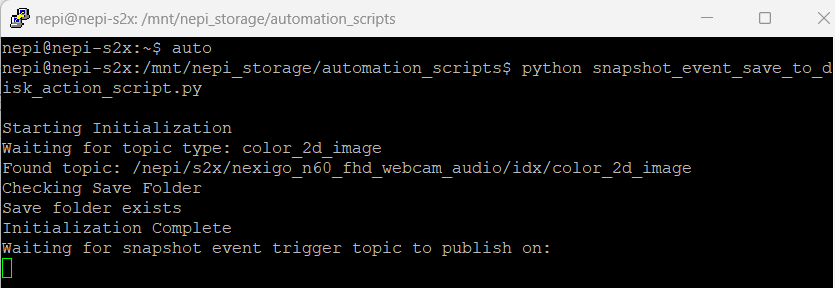
If you are creating or performing a lot of script modifications, it is recommended that you run the script from a command line from an SSH terminal connected to your NEPI device's file system to see real-time print and error messages.
NOTE: For information on creating an SSH terminal connection to your NEPI device's file system, see the tutorial "Accessing the NEPI File System" available at: https://nepi.com/nepi-tutorials/nepi-engine-accessing-the-nepi-file-system/
1) Change directory to the NEPI Automation Script Library by typing
cd /mnt/nepi_storage/automation_scripts/
or use the built in alias
auto
2) type the following replacing the <YourScriptName> with the full name of your script
python <YourScriptName>
3) If you want to stop your script, it is important that you stop it using "Ctrl-C" to trigger a proper shutdown of the script.

ONVIF Application
NEPI Engine - ONVIF Application
Introduction
This tutorial covers NEPI Engine's built-in ONVIF application for autodetecting and configuring access credentials for camera and pan and tilt systems that communicate using the ONVIF interface standard. Once configured, the ONVIF device's configuration is stored in NEPI's ONVIF database.
NOTE: For a list of NEPI ONVIF supported camera and pan tilt systems tested to date, see the NEPI Hardware Driver Support tables available at:
https://nepi.com/documentation/nepi-engine-hardware-driver-support-tables/
What you will need
1) 1x NEPI-enabled device. This tutorial uses an edge-compute processor box that includes an NVIDIA Jetson Xavier NX embedded GPU module with NEPI Engine software installed. (Optional) If you are connecting to your NEPI device through a NEPI configured access point, your NEPI device will also need Wi-Fi support.
NOTE: See available off-the-shelf NEPI enabled edge-compute options at:
2) 1x PC configured to access the NEPI device's RUI browser-based interface and user storage drive. This tutorial uses a Windows 11 PC with built-in WiFi support.
3) 1x or more NEPI supported imaging sensors. This tutorial uses an ONVIF IP HD camera.
Hardware Setup
1) Connect a NEPI IDX driver supported ONVIF hardware to your NEPI device.
NOTE: Your camera may also require an additional PEO or a custom external power supply.
2) Connect the NEPI device to your PC through a NEPI Wi-Fi access point set up on your device, or a wired Ethernet cable (this may require a switch if you are connecting an IP camera as well), then power your NEPI device.
NOTE: Instructions for configuration a PC and connecting to a NEPI device's RUI and user storage drive are provided in the NEPI Engine Getting Started tutorial at:
https://nepi.com/nepi-tutorials/nepi-engine-connecting-and-setup/

Software Setup
Network Connected Devices
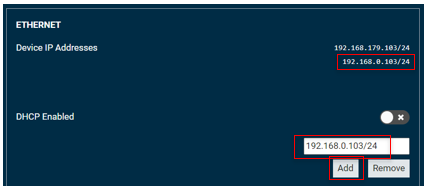
If your ONVIF device connects with an Ethernet cable, you must first add an IP address alias on the same subdomain as the ONVIF device or change your ONVIF's device network IP address to be on the subnet of your NEPI device's base IP address (192.168.179.103). Once configured on the same IP subnet, NEPI can autodetect an ONVIF device.
1) Add an IP address alias by opening the NEPI device's RUI SYSTEM/ADMIN page enter the IP address and netmask you want to add, then click the "Add" button.
Example: For an ONVIF IP camera with a factory set IP address of 192.168.0.150 with netmask 255.255.255.0 (24 in short form), so we will open our NEPI device's RUI SYSTEM/ADMIN tab and add a different IP address value on that same submask like 192.168.0.103/24. After accepting the new IP alias, you will see it appear in the "Device IP Addresses" List above the entry box.
Instructions
The following instructions walk through the process of configuring an autodetected ONVIF device's connection credentials, then testing the connection.
1) After adding all the IP address alias for your ONVIF connected hardware, open the NEPI device's RUI APPLICATION/ONVIF tab. In the left pane, you will see a list of ONVIF autodetected devices.
2) Select one of the devices to see the device's connection port details in the top section of the right pane.
3) Once you find the ONVIF device you want to configure credentials for, enter the username, password, and a basename in the entry boxes in the lower section of the right pane. You must come up with a suitable basename that describes your device, and each device's basename must be unique.
NOTE: If your ONVIF device does not require a username and password to connect, you must still enter some value so that the configuration file can be created properly. Your device will ignore these credentials when connecting.
NOTE: DO NOT USE "-" SYMBOLS IN THE BASENAME. USE "_" INSTEAD.
4) Select the appropriate driver support using the selection switches under the input boxes.
- IDX Enabled -> Select for camera type devices
- PTX Enabled -> Select for pan tilt type devices.
NOTE: If your device includes both camera and pan tilt support, then select both options.
5) Click the "Apply Changes" button when you are ready to save your device configuration. Your device will then show up in the "Configured Devices" middle pane, and the device's current configuration and connection details in the top right-hand pane.
NOTE: Be sure the "Connected" box is Green before moving on.
6) Configure any additional ONVIF devices connected.
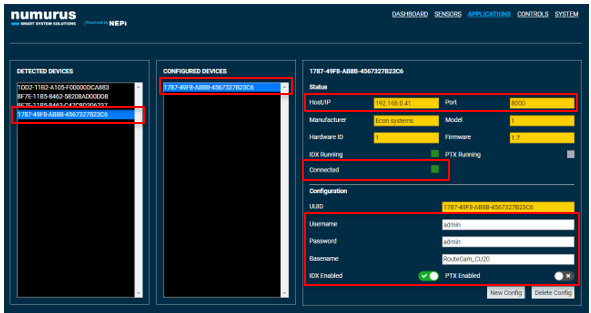
Image Viewer Application
Introduction
This tutorial covers NEPI Engine's built-in Image Viewer application which supports viewing up to 4 imaging streams simultaneously. The application supports connecting to any available image stream on the NEPI device such as:
1. Multiple output streams from a single camera
2. Video streams from different cameras
3. AI detector output image streams
4. Automation script output image streams
This tutorial will show examples of connecting and viewing all four of these image stream sources using the Image Viewer application.
What you will need
1) 1x NEPI-enabled device with internet access. This tutorial uses an edge-compute processor box that includes an NVIDIA Jetson Xavier NX embedded GPU module with NEPI Engine software installed.
NOTE: See available off-the-shelf NEPI enabled edge-compute options at: /hardware/
2) 1x PC with internet access and configured to access the NEPI device's RUI browser-based interface and user storage drive. This tutorial uses a Windows 11 PC and a USB GigE Ethernet adapter and Ethernet cable.
NOTE: Instructions for configuration a PC and connecting to a NEPI device's RUI and user storage drive are provided in the NEPI Engine Getting Started tutorial at: https://nepi.com/nepi-tutorials/nepi-engine-connecting-and-setup/
3) 2x NEPI IDX supported 2D cameras. This tutorial uses two USB webcam cameras.
NOTE: See the NEPI Engine Hardware Interfacing tutorial "Imaging Sensors" for details on connecting a camera to your NEPI device at: https://nepi.com/tutorials/
Hardware Setup
1) Connect the two NEPI IDX driver supported cameras to your NEPI device.
2) Connect the NEPI device to your PC's Ethernet adapter using an Ethernet cable, then power your NEPI device.
Viewing Data From Two Cameras
In this section we will view image streams being produced by our two connected cameras. Each of these cameras produces both a color and a black & white image stream we can connect to an view with the Image Viewer application
1) On your PC, open your NEPI device's RUI and select the Applications/Image Viewer tab from the top menu to open the NEPI Image Viewer application page.
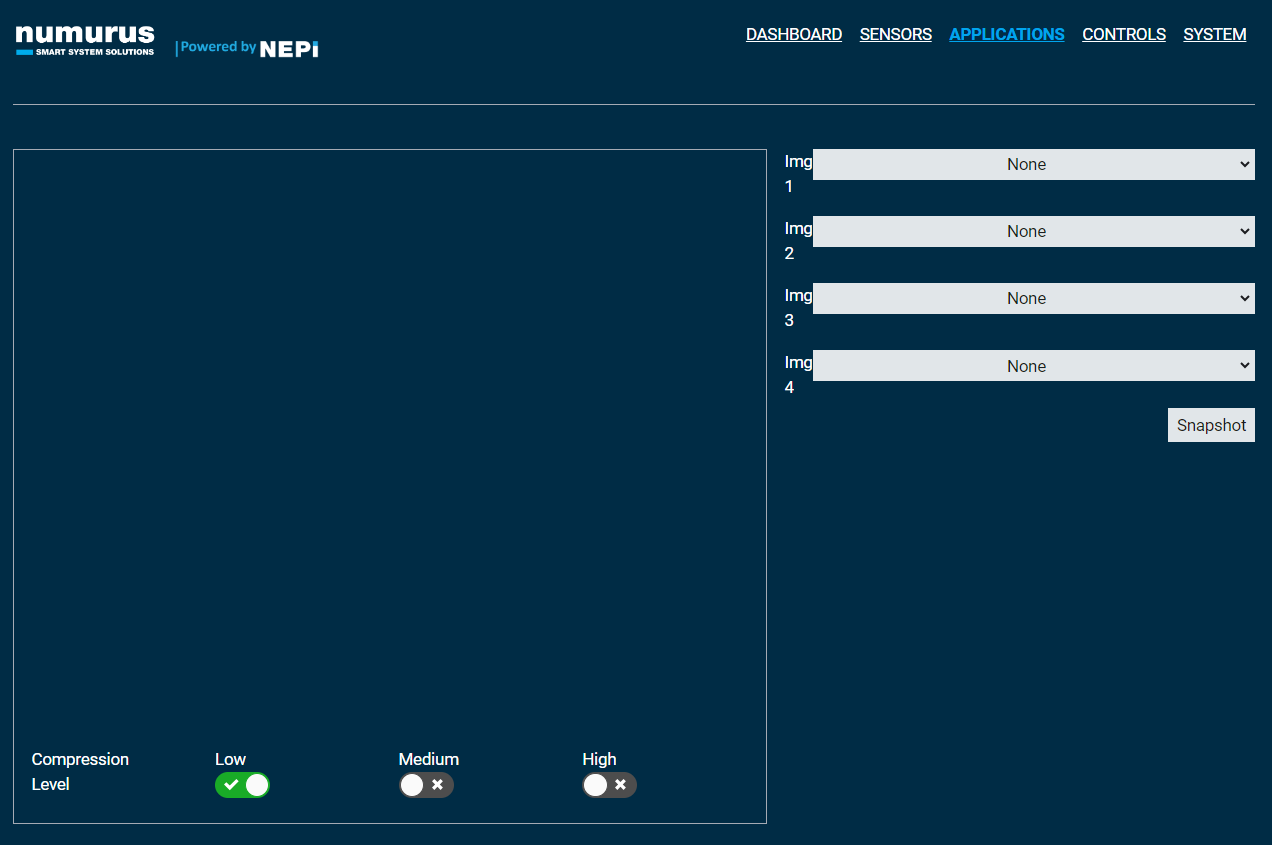
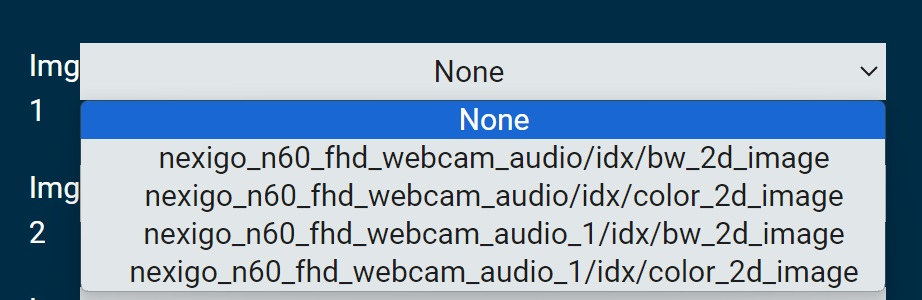
2) Using the image topic selection boxes on the top right pane of the application, select the images from the dropdown boxes you want to populate the viewing pane with. The dropdown box shows both the image stream source (i.e. nexigo n60 fhd webcam) and the type of data presented by the topic (i.e. black and white 2d image). Since we have two cameras of the same type connected, the IDX driver system assigns a _1 to the second camera during the auto-detect process.
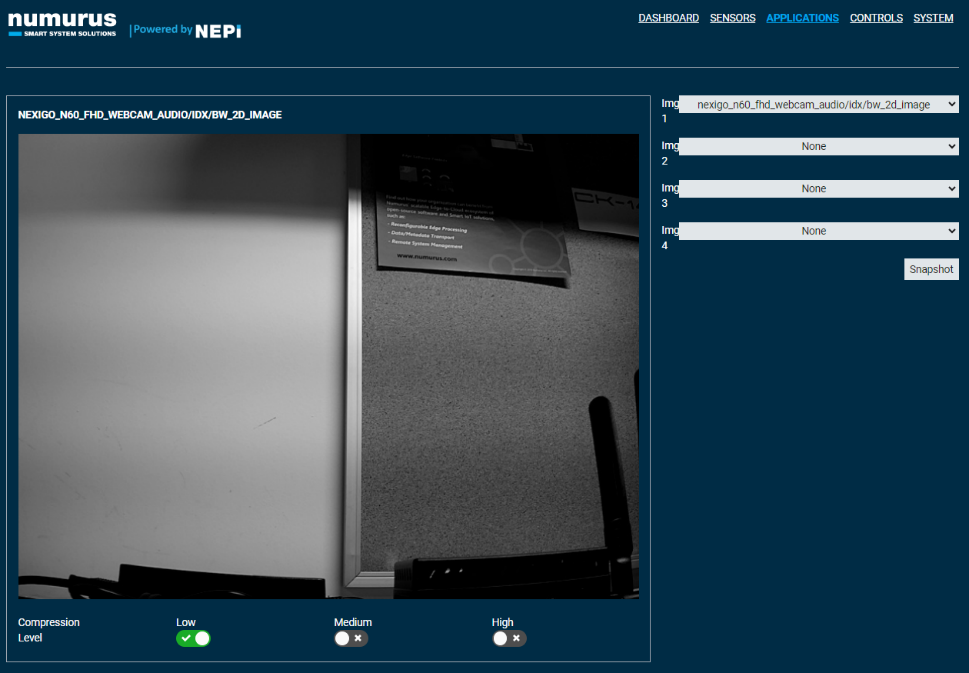
3) Select the black and white image from the first camera in the dropdown pane. The first image will fill the entire image pane.
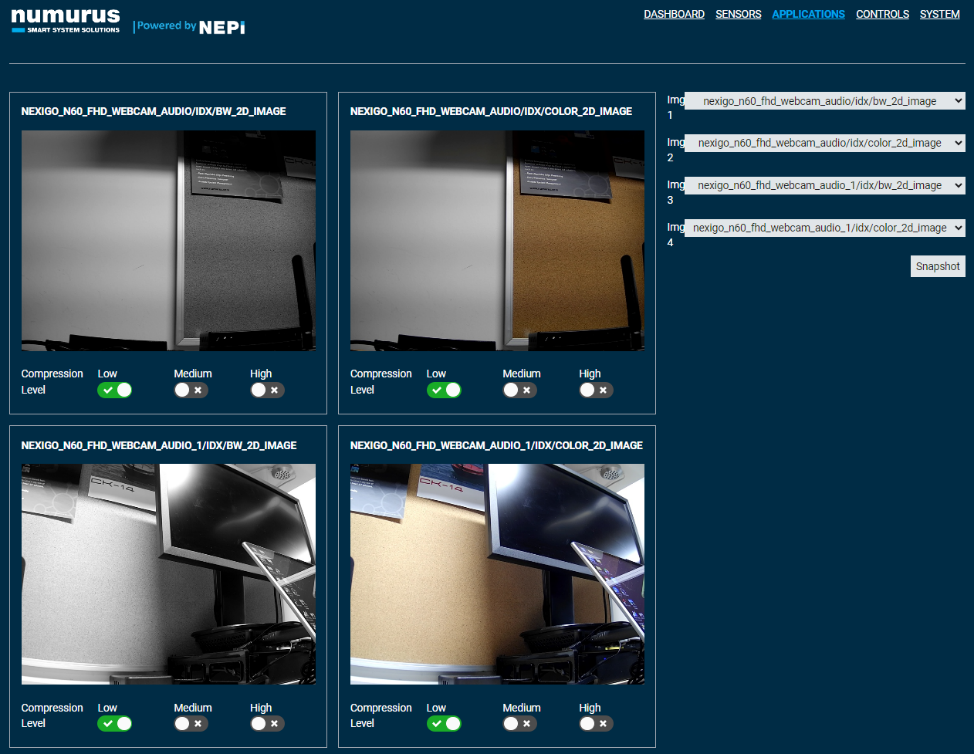
4) In the remaining image selection dropdown boxes, select the remaining cameras and image types in the order presented, which will open up additional image viewing panes for each image stream, dynamically adjusting the image stream views to fill the space.
Viewing Camera and Processed Data
In this section we will view the raw image streams from one of our connected cameras along with the processed data output from the NEPI AI and Automation applications, which are each covered separately in other tutorials in this series.
NOTE: The following example assumes we have started an AI detection process using the NEPI AI application that publishes a new image stream called "detection_image" with AI detection bounding boxes and labels overlayed on the camera's color image stream, and a NEPI automation image contours process script that publishes a new image stream called "image_contours" with contour data overlayed on the camera's color image stream.
To learn how to use NEPI's AI and Automation applications, as well as access the AI models and automation scripts used in this tutorial, see NEPI Engine Application tutorials at each subject at: https://nepi.com/tutorials/
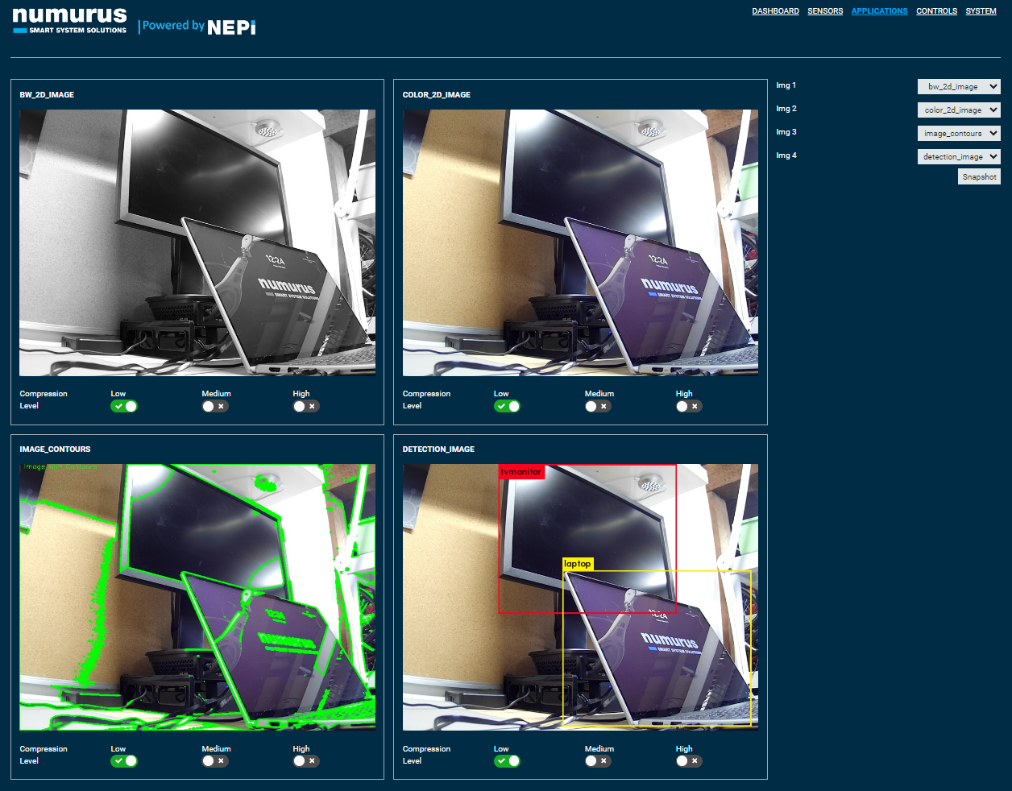
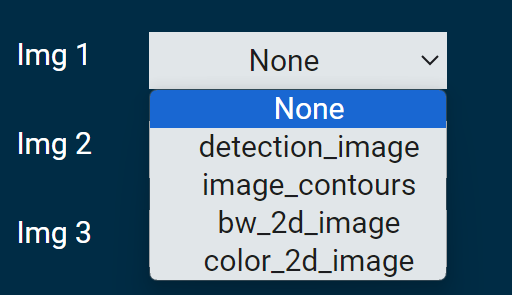
1) On your PC, open your NEPI device's RUI APPLICATIONS/IMAGE VIEWER tab and select the images from the dropdown boxes in the order we want them to populate the viewing pane with. Select image streams for all four image panes in the following order:
bw_2d_image, color_2d_image, image contours, detection_image
You should see all four images streaming simultaneously. This can be useful for both evaluation image process outputs and the delays each process incurs.